Desertcart purchases this item on your behalf and handles shipping, customs, and support to Iceland.
💧 Seal your pond with confidence—durability meets eco-chic style!
Pond Armor Pond Shield is a U.S.-made, non-toxic epoxy paint designed specifically for waterproofing ponds and water features. It offers superior adhesion to diverse surfaces including concrete, wood, metal, and plastics, with a flexible formula that withstands extreme temperatures from -78°F to 140°F. This fast-curing, self-priming epoxy provides a maintenance-friendly, algae-resistant finish available in 11 vibrant colors, including Competition Blue, making it the smart, stylish choice for professional-grade aquatic environments.


| ASIN | B00D32WJTM |
| Age Range Description | Adult |
| Best Sellers Rank | #126,382 in Patio, Lawn & Garden ( See Top 100 in Patio, Lawn & Garden ) #85 in Water Garden & Pond Liners & Seals |
| Brand | Pond Armor |
| Brand Name | Pond Armor |
| Color | Competition Blue |
| Color Code | #034bc1 |
| Container Type | Can |
| Coverage | up to 60 square feet |
| Customer Reviews | 4.4 out of 5 stars 264 Reviews |
| Dry Time In Hours | 24 |
| Finish Type | Gloss |
| Full Cure Time | 24 hours |
| Global Trade Identification Number | 00896772001099 |
| Indoor Outdoor Usage | Outdoor |
| Is Waterproof | True |
| Item Form | Liquid |
| Item Volume | 1.5 quarts |
| Manufacturer | Pond Armor |
| Model Number | SKU-CBLUE-QT-R |
| Part Number | SKU-CBLUE-QT-R |
| Size | 48 Fl Oz (Pack of 1) |
| Special Feature | Non Toxic |
| Special Features | Non Toxic |
| Specific Uses For Product | Interior/Exterior |
| Surface Recommendation | Concrete |
| UPC | 896772001099 |
| Unit Count | 48 Fluid Ounces |
| Water Resistance Level | Waterproof |
F**T
Using pond armor on a galvanized steel stock tank to make it in to a pond!
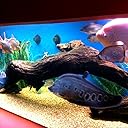
Steel Stock Tank I had a great experience Making a pond with a galvanized steel stock tank and Pond Armor! The paint is a beautiful glossy blue that is silky smooth! The goldfish look fantastic against the blue, and the water looks clean and pretty. I was really nervous I was gonna mess the paint up, even called pond armor to get some tips about if I needed a primer paint or not and they were really nice and helpful. Turns out I didn’t have to have a primer. I bought rollers, but didn’t use them. The paint brushes worked fine, although twice I had a paintbrush hair that came off, I just picked it up with my fingers and smoothed the surface again with the brush. The paint came out looking smooth and glossy like I professionally sprayed it on or something just with the medium cheep brush. On the first coat I forgot to wear gloves which was a mistake!!! Don’t forget them! I really recommend this paint, I think it turned out great and worth the extra expense. It’s much nicer than a bunched up black liner that actually isn’t cheep. I also think I could have just sanded the tank by hand instead of using the electric sander. Here is the steps and supply list I used. Supplies: 1. pond armor 2. Denatured alcohol 3. Paint sticks 4. White vinegar 5. Spray bottle 6. Sponge 7. 60 grit sand paper 8. Mask 9. 2 paint brushes- medium cheepness because you won’t be able to use the brushes again. 10. Cheep plastic tarp for floor 11. Acetone Incase you need to clean anything you get paint on. 12. Gloves 13. Painters tape 14. Crappy clothes you don’t care if you get paint on them. 15. Screwdriver or paint can opener to open cans. 16. Several plastic painters cups or cheep dollar store measuring cups. Steps: Day one 1. Get supplies and plan project, think of a day when you will have time to do both coats and weather is good. Think of how much paint you will need to cover your tank. My tank was a 90 gallon and I was able to get two coats and had some extra I used to paint some cinderblocks. 2. Sand the tank with 60 grit sand paper first with electric sander then by hand. 3. Spray white vinegar on tank, I let it sit for a few minuets. 4. Wash/ rinse tank by spraying it down with a hose and a sponge. Then dry well. Day two 1. Tape off top of tank under rolled steel at the top of tank with painters tape. 2. Measure part A, part B , and alcohol in the cheep plastic paint cups then mix it all up together by using the paint stick. 3. Transfer mixture to new container. 4. Apply first coat with a paint brush. Start with sides at the top of the tank under taped off ledge of tank then do floor, then wait a few hrs. 5. Apply second coat same way, measure, mix, transfer to new container and use a new paint brush. 6. Wait at least 24 hours then fill the tank 7. Admire results with friends and family :)
J**.
From Pond to Plunge: The Freezer Fixer That Makes a Splash!
Alright folks, gather ‘round because I’ve got a tale of epic proportions involving Pond Armor Non-Toxic Pond Shield Epoxy Paint and a chest freezer that just got a major upgrade. Picture this: I decided to turn my trusty old chest freezer into a cold plunge tub—because who doesn’t want to experience the thrill of an Arctic dip from the comfort of their own home? But first, I needed a hero to seal the deal. Enter Pond Armor’s Competition Blue paint, the unsung champion of epic DIY projects. First, let’s talk application. Applying this paint felt like creating a masterpiece. The epoxy went on smoother than a jazz saxophonist on a Saturday night. It adhered perfectly, sealing every nook and cranny of the freezer. No more leaks, no more drips—just a beautifully sealed, frost-ready fortress. It’s like this paint was designed specifically for freezer-to-plunge transformations. The color? Oh, it’s nothing short of spectacular. Competition Blue is the kind of color that makes your chest freezer look like it belongs in a high-end spa. Every time I open the lid, it’s like unveiling a brilliant blue wonderland. My friends now refer to it as “The Ice Palace”—and who am I to argue with that? And let’s not forget the non-toxic, eco-friendly aspect. This is the kind of paint that makes you feel good about your choices. It’s like the paint equivalent of a green smoothie—safe for you, safe for the environment, and it won’t harm your cold plunge dreams. My freezer is now a safe, stylish oasis, and I can enjoy my Arctic adventures without any worry. In summary, if you’re looking to turn an ordinary chest freezer into a plunge pool of wonder and style, Pond Armor’s Competition Blue is your go-to. Five stars, a virtual high-five, and a salute to this extraordinary paint that’s as versatile as it is vibrant. Dive in, enjoy the plunge, and bask in the glory of your brilliantly blue creation!
A**E
Impressive pool paint
This paint was rate #1 for painting metals such as a galvanized tank. We bought it and it works great! We painted the inside of our 10' wide metal stock tank to It looks beautiful! But.....if you dont like hard work, I suggest you buy a cheap liner and let it be. There are about 4 steps to take in order to make this look great. But Im sure glad we did. Buy the tank of your choice, sand tank (etch) with 80 grid sand paper, wipe throughly with white vinegar, let dry, mux both cans of paint and start painting quickly as it sets up very fast. There are so many outdoor pool ideas with these tanks without the expense of a "real" pool! Empty it in the winter, refill in the Spring. Love it. We chose the Competition Blue color. Great choice!
J**N
Selected because it was cheapest.
Customer service is terrible, best bet is to watch videos on YouTube. I felt they were rude to me and didn’t answer my question at all. Working time for the material like the most popular video on YouTube was much shorter than the 20-30m they claim. I had about eight minutes on the first batch and a little more on the second. Used alcohol. Spread easily, used a standard size roller and a brush. I used this product for the color and not sealing. I do think it would seal. It was the cheapest one on the market. Gloves would probably be a good idea, it will still get everywhere.
J**D
Easy to apply; follow up: not worth the effort
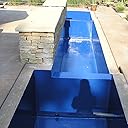
What you get from Amazon: 1 quart of epoxy paint; ½ quart of hardener; instruction sheet. There was no millimeter measuring tool described in the instruction sheet. Project description: apply Pond Armor to a swimming pool concrete waterslide which is 6ft curved width x 14ft length = 84 sq ft. First wire brushed the slide and did the acid wash suggested in the instruction. The helpful Pond Armor customer service guy suggested I start applying at 6 AM and that I have a heating device ready to make any bubbles disappear; I had a hair dryer (don’t scorch or burn the pond armor) but there were no bubbles so I didn’t have to use it. I started at 7:30 AM August 8th, 2020 when it was cloudy and 70 degrees in San Diego. It took me four small batches and 90 minutes to apply the first coat using one good quality three inch brush on our 84 sq ft water slide. I still had to pick out about twenty brush bristles that stuck to the pond armor. I used 2/3’rds of the 1½ quart package. At 10:30 AM 80 degrees and sunny, the first coat was almost completely dry and slightly tacky. The brush from the first coat was rock hard so I threw it away. So I started applying the second coat; working quickly I applied about 20 sq ft in 15 minutes and then my batch turned into a lumpy mess so I quit for the day. At this hotter temperature (80 degrees) it’s too hard to quickly brush on the pond armor. Because I didn’t apply a 2nd coat when the first coat was tacky due to the heat, next day I had to lightly use 60 grit sandpaper on the 1st coat, making it ready to accept the second coat. Day 3 it was cloudy at 7:15 AM; applied the final coat in three batches over 30 minutes. Application technique: this material is self leveling so you can brush side to side or top to bottom. My waterslide was too curved to use even a 4 inch flat squeegee. Overall: great product; very slippery. Items needed for applying pond armor: Six pairs of disposable blue gloves. 16 oz container of Denatured alcohol or 70% or 90% isopropyl alcohol to mix with the hardener and the epoxy paint; also use it to clean off any stray pieces of epoxy paint. Six three-inch brushes; good quality so bristles do not come out of the brush and stick to the pond armor. Five used clean empty quart ice cream containers for mixing the alcohol, hardener, and epoxy. Six small measuring cups from laundry soap containers, with handles, no more than 2 inches wide to fit into the 3 inch wide quart container opening. Small trash can with plastic liner for used up gloves, brushes, paper towels, etc. Two years later follow up review: started flaking and faded; not worth the effort; just buy pool paint.
L**A
Work fast!
Old concrete bird bath and fiberglass fountain got a face-lift. Cleaned well, let dry and painted. Used the touch up pouch size in a different color for the inside of the bird bath dish. Depending on the size of your project or projects, mix half portions at a time or have multiple people and brushes to work fast. I mixed too much the first batch and got less done then I thought before it started to harden. Had to throw away a lot. Next batch I cut in half and enlisted a helper to paint another item at the same time. Used this stuff many years ago for a small fiberglass koi pond. Works great, just clean and prep well and work fast! I used the "with rubbing alcohol " method to make it easier to spread on slightly rough surfaces.
J**F
Exceptional coating and customer service
I have a large fountain in my garden that had only a skim coat of cement the mason thought would seal it. It didn't. Water soaked through the concrete constantly. So I tried Pond Armor--it's excellent and I highly recommend it. It went on very nicely and after two coats I have a beautiful surface that looks and feels like glass. Follow the instructions carefully and use gloves at all times. You'll need containers for mixing, mixing sticks and to provide your own alcohol to mix in--it's not complicated once you line it up, and it applies nicely, though it's very sticky as you'd expect. If you are (very) adventurous, you can mix colors. This is what I did (three blue and one green to get a dark aqua) and achieved the perfect color. I also reached out to the company for advice a few times by email and they responded quickly and thoroughly answered my questions. If you are doing a large area, consider buying one box (there are two cans per box that you mix together) and completing two coats to see how much you need. My base concrete didn't absorb much and I got twice the coverage the company says to expect, so I ended up returning some unused boxes.
M**E
Beautiful Pond, Happy Koi
This spring, I built a 150-gallon stock tank pond for my small koi. Previously, I had a black PondSkin liner inside of a galvanized stock tank (fish cannot live in a galvanized—zinc-coated—environment; it is toxic), but I wanted something that looked better and was colorful. I searched for a coating that would adhere to galvanized metal, and would be nontoxic to fish. I found Pond Armor, and was very pleased with the array of colors. I read the application instructions on their website, and also called customer service to find a self-etching primer that would adhere to galvanized metal (it must be water-based to stick to zinc). They were helpful, and gave me additional tips outside of the printed instructions. I found prepping the tank as instructed to be easy, and had a great experience applying it—I applied it in my garage on a cooler day with a paintbrush; it spread easily took a long time (30 minutes or more) to get tacky. Best of all, it had almost no odor compared to most epoxies I’ve used. Now, at the end of the summer, the pond looks great and I’ve had no issues with leaking or zinc leaching. The blue color is an intense cobalt, and brings out the white, orange, and yellow in my koi—they glow! I’m an experienced DIYer, and recommend that even users experienced with epoxies contact Pond Armor for additional tips. My project turned out better because of them. At the end of next summer, my little guys will probably have outgrown their tank, and I plan to use Pond Armor again on a larger stock tank.
D**D
No seca
Para ser sincero aplicamos la pintura como las instrucciones y una parte no seco (desconozco las razones) no dan ayuda técnica. Pero la mayor parte si funcionó.
K**M
Nice color
Worked
W**E
We got the goods with all this lockdown
Pond shield come to day 24th May 2020 it to paint a plywood aquarium we havant started it yet we let you now when we’ve finished the job, all the best and keep healthy in this time of lockdown, Regards WAB.
S**A
Great for waterproofing
Used to restore older pond hard linear for my lizard new terrarium. Product easy to apply even on not flat surface; stays in place, doesn’t drip, cures fast. Beautiful final result. Odour free and pet safe
K**B
Doesn’t not blemish or different colour base!
Product looks great after spending a lot of product... love the company. Great help. Can’t wait to finish the project next spring and swim in my concrete pool.
Trustpilot
1 month ago
3 weeks ago