We remain fully operational. Our teams are working around the clock to ensure your deliveries continue safely.

DOWNLOAD THE APP


Copyright © 2025 Desertcart Holdings Limited
DOWNLOAD THE APP


Buy anything from 5,000+ international stores. One checkout price. No surprise fees. Join 2M+ shoppers on Desertcart.
Desertcart purchases this item on your behalf and handles shipping, customs, and support to Iceland.
🔗 Bridge the gap between old and new—upgrade your storage game effortlessly!
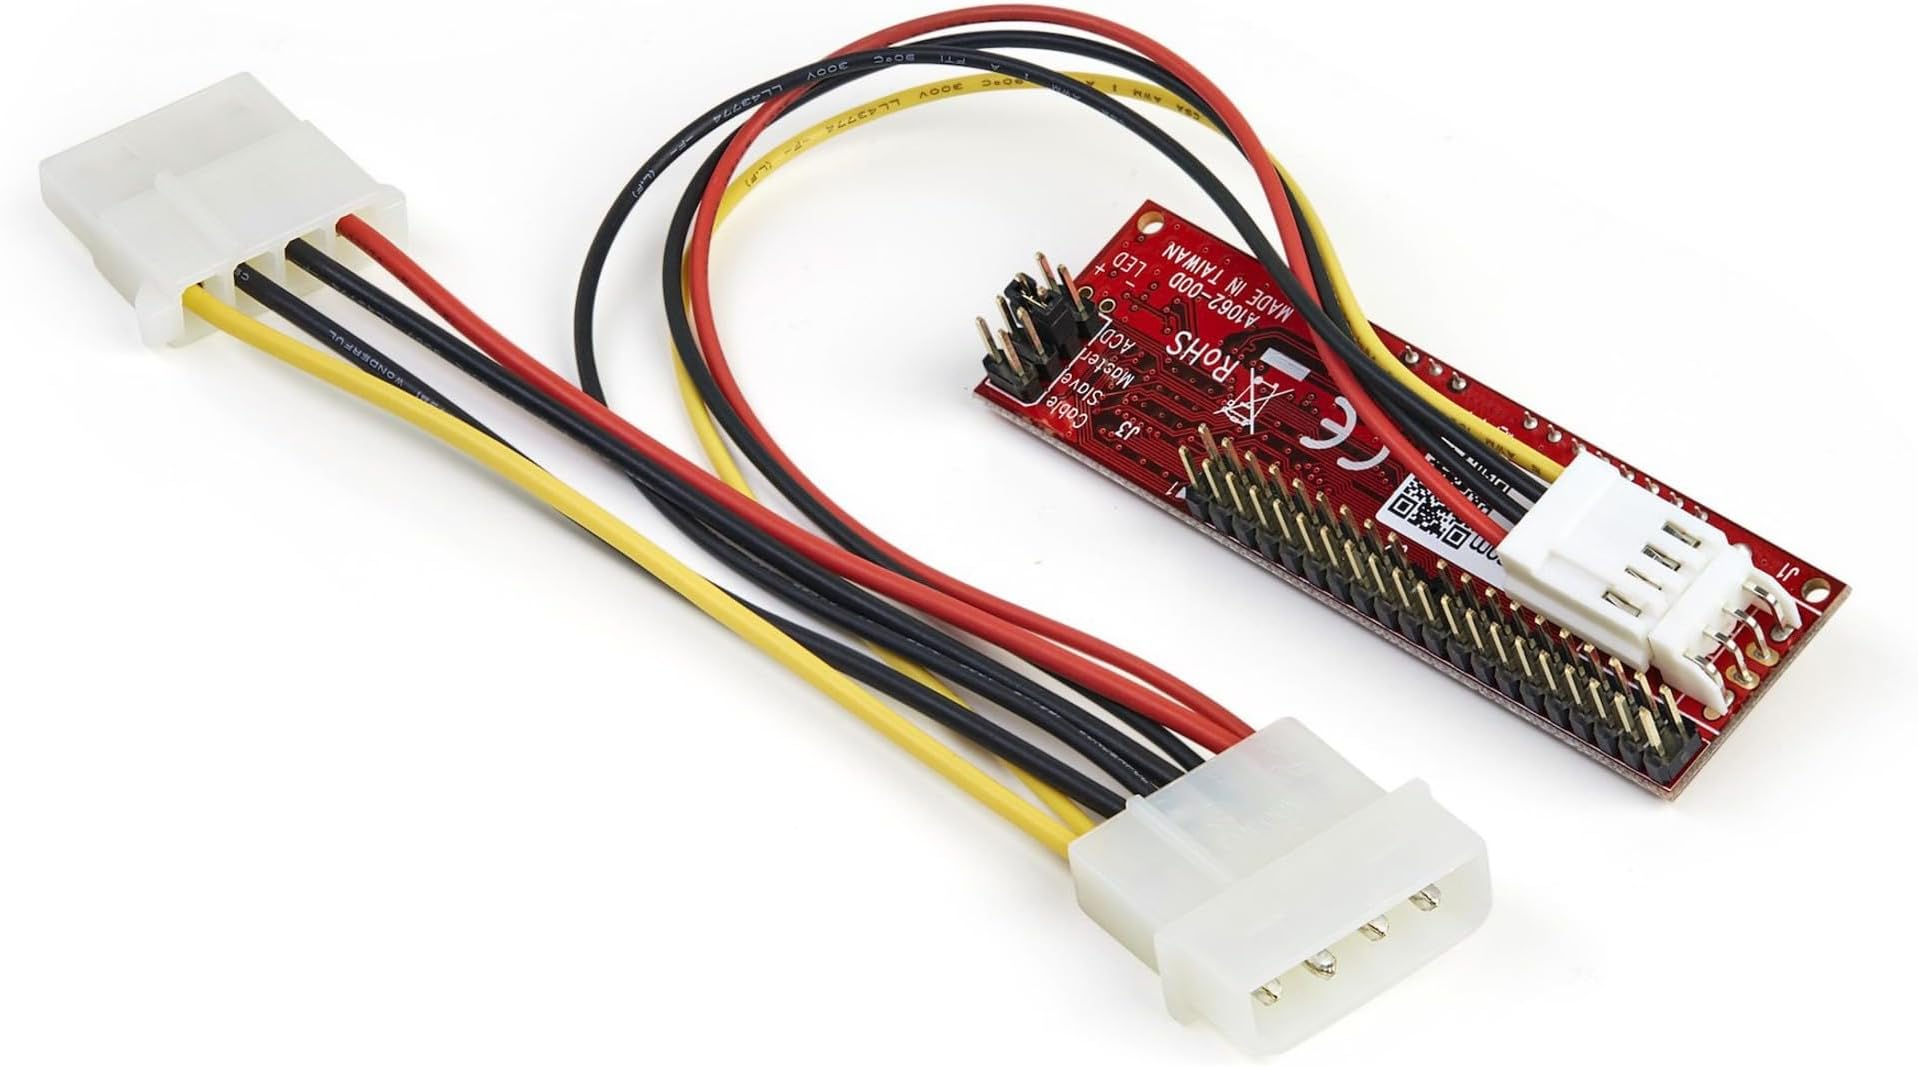
The StarTech.com IDE2SAT2 adapter converts 40-pin IDE motherboard ports to SATA connections, enabling the use of modern 2.5, 3.5, and 5.25-inch SATA hard drives and optical drives on legacy systems. It supports SATA versions 1.0 through 3.0 and IDE/ATA 33/66/100/133 standards, requires no additional drivers, and includes a power cable for easy installation. With over 30 years of industry experience, StarTech.com offers a 2-year warranty and lifetime technical support, making this adapter a reliable and cost-effective solution for extending the life of older computers.


| ASIN | B00EOJNGC2 |
| Amazon Bestseller | #17,532 in Computers ( See Top 100 in Computers ) #93 in Enclosures |
| Brand | StarTech.com |
| Compatible Devices | Laptop |
| Connector Type | SATA |
| Customer Reviews | 4.7 4.7 out of 5 stars (1,872) |
| External Testing Certification | FCC, CE |
| Global Trade Identification Number | 00065030852258 |
| Item Dimensions | 7.6 x 2 x 2.3 cm |
| Item Weight | 0.03 Kilograms |
| Manufacturer | スターテック(StarTech.com) |
| Mfr Part Number | IDE2SAT2 |
| Model Number | IDE2SAT2 |
| Number of Ports | 1 |
| Package Quantity | 1 |
| Power Plug Type | No Plug |
| UPC | 065030852258 |
| Warranty Type | Limited |
A**ー
旧式3.5インチを2.5インチHDDを変更に使用した 動作良好でした
L**F
使えなかかった
C**R
This product is fantastic. Much better than the cheap options available on facebook. Upon receipt I was blown away by the weight of the product compared to the cheap one I was sending back. Typical Startech quality on full display here. The Good: - Works seamlessly in an original xbox to allow for the use of massive SATA drives (I used it to max out the 2TB limitation of the hardware) - Made with good materials - Includes a molex passthrough to chain the adapter between a source and another drive - Includes jumpers to allow master/slave/cable select - The power adapter attaches parallel to the board, freeing up space in otherwise craped situations The Bad: - Both sides of the board is left entirely exposed, inviting shorts. Would highly recommend taping off the back of the board, regardless of use - The power cable uses the mini-molex plug used by legacy floppy drives, meaning you need to use the included cable to power the adapter. Not a deal breaker, but extra, unnecessary, wires always suck The Ugly: - As opposed to a standard plastic ATA socket, this adapter uses a pin header. Your IDE ribbon will fit fine, but it seems to attach muss less sturdy This device is 300% of the price of competing cheap options, but it is largely worth it to have a one-and-done solution. If you're looking to upgrade your original xbox hard drive in 2021, you really can't go wrong with this.
K**Y
Najważniejsze, że ze starym kontrolerem IDE nowy napęd DVD działa, co prawda jeden - tak jakby przejściówka zapisywała sobie go (ten pierwszy napęd podpięty do niej) w pamięci i już żadnego innego nie chciała rozpoznać (jakaś metoda na jej reset?).
B**N
I've used a few of these in Windows 98 gaming PCs that only support IDE. It means that all of the SATA HDD's I have lying around can be installed in these retro systems, as IDE drives are hard to find and overpriced these days. There are some operating system and hardware limitations of your retro system if you wish to use larger SATA drives, so be prepared to use something like Seatools to "trick" your larger SATA drive into thinking it's only 128GB/137GB in capacity for Win98 usage for example.. I've tried cheap ebay copies of this item and they are intermittent, it's not worth the hassle, spend the money on this for a reliable and great experience ;-)
R**N
I used this with a SATA HDD to upgrade an IDE based audio recorder (Yamaha AW1600). It worked well with the two drives I tested. These were a Vertex 2 SATA II 60GB and a Samsung 840 EVO 250GB. Having tried two other SATA to IDE interfaces, this was the only one I found that worked properly in my particular scenario. The other interfaces I tried either did not work fully or were very slow. I have not done exhaustive testing but it does appear that this is a very good product.
M**E
Läuft perfekt in meiner XBOX-CLASSIC V1.1
Trustpilot
3 days ago
1 month ago