Buy anything from 5,000+ international stores. One checkout price. No surprise fees. Join 2M+ shoppers on Desertcart.
Desertcart purchases this item on your behalf and handles shipping, customs, and support to Iceland.
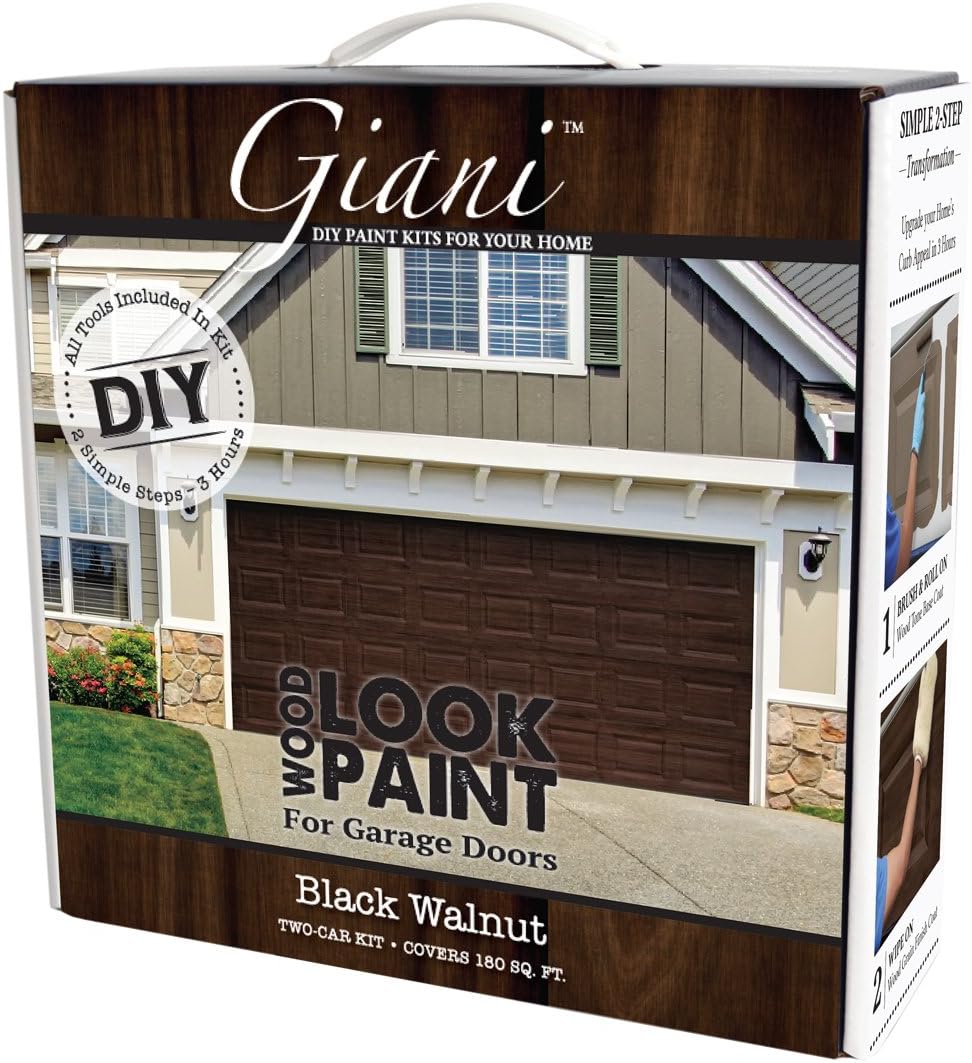
🖼️ Elevate your curb appeal—wood look, zero wait, all wow!
The Giani Wood Look Paint Kit in Black Walnut offers a fast, easy, and durable way to transform your garage door with a realistic wood grain finish. This water-based acrylic kit includes everything needed for a professional-grade makeover in just 3 hours, covering up to 180 sq. ft. Its fade-resistant, weatherproof formula ensures long-lasting beauty with low odor and VOCs, making it ideal for outdoor use on metal or wood doors.


| ASIN | B0766685D8 |
| Age Range Description | Adult |
| Best Sellers Rank | #26,727 in Tools & Home Improvement ( See Top 100 in Tools & Home Improvement ) #66 in Interior & Exterior House Paint |
| Brand | Giani |
| Brand Name | Giani |
| Color | Black Walnut |
| Color Code | #27190E |
| Container Type | Can |
| Coverage | 180 |
| Customer Reviews | 4.5 out of 5 stars 1,524 Reviews |
| Finish Type | Wood Grain |
| Full Cure Time | 3 Hours |
| Global Trade Identification Number | 00856512007309 |
| Included Components | Two 16 oz. Black Walnut Wood Tone Base Coat Two 16 oz. Black Walnut Wood Grain Finish Coat Giani Paint Mitt & Adjustable Wrist Band 2" Brush 2 Plastic Tarps Roll Painter's Tape 6" Roller Arm & 1 Cover 2 Stir Sticks Step-By-Step Instructions |
| Indoor Outdoor Usage | Outdoor |
| Is Waterproof | True |
| Item Form | Liquid |
| Item Type Name | Paint Kit |
| Item Volume | 16 Fluid Ounces |
| Manufacturer | Giani, Inc. |
| Model Name | Garage Door |
| Model Number | Wood Look |
| Paint Type | Acrylic |
| Part Number | FG-WL WAL 2 KIT |
| Size | 1 Count (Pack of 1) |
| Special Feature | Fade Resistant |
| Special Features | Fade Resistant |
| Specific Uses For Product | Door,Doors |
| Surface Recommendation | Metal |
| UPC | 856512007309 |
| Unit Count | 1.0 Count |
| Water Resistance Level | Water Resistant |
A**L
Looks like real wood!
Absolutely love this kit! It completely transformed my garage door and gave it a beautiful wood look without the cost of replacing it. The process was straightforward, and the results look high-end and realistic. I’ve already gotten so many compliments—highly recommend!
B**R
Wood grain door review
We bought this to freshen up the appearance of our weathered and faded aluminum garage doors. The first order arrived with a leaking can of paint that was readily replaced. We put on the base coat with the included roller. It went on nice and even and maybe took 30 minutes to do a standard garage door. We let the base dry and then I applied the wood grain paint with the included mit. The application was fairly easy and turned out pretty good. My only bought was it was difficult to fade the wood grain in evenly along all the edges. Perhaps a roller head with a similar material as the glove would allow more even distribution of the wood grain paint along the edges. I’ve read where most people had enough supplies for two standard doors. I guess I put it on to heavy since one kit only covered one door but saying that I also did the wood trim around the door seals. Overall, I’m satisfied with the outcome and wood recommend it if your looking for more of a weathered burnt look. Ultimately we had to use two kits and maybe had 3-4 hours in total on both doors. A case could be made for just painting the doors if you’re wanting it done fast with less work. Again, I somewhat pleased with the outcome and it’s growing on us.
A**R
Easy process for a realistic wood look
I looked into different products and read lots of reviews before deciding on this brand. Although this seemed to be the better option for me, based on reviews and an online tutorial, I had already decided that I wasn't going to use the mitt included with the kit. The first coat went on nice and even (first picture- tan color), and I had at least 1/4 of the paint left over. The darker color that goes on top is more of a glaze or gel stain. I followed the directions carefully, making sure to only apply when the sun was not directly shining on the garage, and when the temp was below 85°. I brushed it on using the paint brush included in the kit, then I used an inexpensive chip brush (dry) to brush through the wet stain. This helped to pull the stain through, making it more even, and more realistic looking. I brushed in long horizontal lines for the borders of each panel, then brushed the panels in vertical strokes. I even added diagonal "mitered" lines in the corners. You could use masking tape to make all of the lines crisp and realistic looking, but I free handed it. After applying one coat of the gel stain (darker color) I had half a can left, which I intended to use for touch ups, or to even out drastic color variations. In the end, the family consensus was that it looked great just as it was, so I reinstalled the decorative hardware and called it good. We have had several neighbors stop by to tell us how much they love the transformation, many saying they would have thought it was real wood. I can't vouch for the mitt method, but bad on my end results, I would highly recommend this product
J**A
Great price point for high end looking garage doors!
Absolutely love how they turned out!!! The product itself was fantastic! However, the application and time needed, I don’t feel was accurate. I am a perfectionist so I took a lot of extra steps. I didn’t use the mitt; instead I used a 1.5 Purdy angled brush to paint on the stain and a then a dry 3 Purdy angled brushed to add in grain strokes. I tried free handing the cuts on 2 panels and that took forever (I’m not super skilled and slow at cutting) and I found that taping I liked better and was quicker. I would recommend working in small sections to get the stain to look how you want it, as it does dry fast. I also went with 1 thicker coat rather than 2 coats. I painted the base coat on both doors rather quickly, then worked on staining the panels for days, mainly to avoid the sun per the directions. Each panel took approximately 2-3 hours to stain. For both doors I had literally just enough product for the base coat, and a little left over from the stain. With that said, considering the price and results, you can’t beat this product and it was well worth the time and effort! My only slightly negative comment would be the color overall. In some lighting it looks exactly like what I wanted, English oak, and in others it looks as though it has a reddish tint.
B**K
A terrific low cost project for much needed curb appeal
I live in an HOA and several of the house have wood looking garage doors. I’ve always been envious of them, but the cost of a replacement wood look door is 5-8k or even more. I was browsing on Amazon on day when this kit showed up as a recommendation. I read some reviews and purchased. My current garage door is plain white and is made of metal. The first step I took was to sand the door lightly using 220 grit sandpaper. After that I scrubbed it with dawn soap and water and let it dry overnight. The next morning I put 2 coats of the base paint on the door. 2 coats ran both pints dry. After letting that dry completely, I put on the included glove and went to work with the stain. I was able to coat the door twice using only 1 pint of the stain. I may eventually add a third coat, but I think I’m happy with the results. The kit included everything you need to get the job done, minus a roller tray and a tray cover. The quality of the base paint and the stain was fantastic. I feel like it’s going to be very durable in the weather here. I took out the windows and spray painted the frames black to stand out. I liked that they offered 4 colors, but my brick is darker so I wanted to go with a slightly darker color. I rolled the base coat on using the included roller and applied the top stain coat with the included glove. So let’s talk about the glove. I’m 6’ and have big hands. This glove, or rather a mitten, was humongous on me. The mitten itself was about 1 and a half times the size of my hand. Unfortunately, there is a plastic insert inside the glove that protects your hand from the stain. The insert is normal hand size. So it feels really weird to wear the mitten that your hand won’t fully fit. I ended up just balling up the top part of the glove and rubbing the stain in like that. After all said and done, I added some magnetic accessories to the door that I found here on Amazon also. The total finished look is fantastic. I couldn’t be happier with the end result. I feel like the whole kit is super easy to use and the value is incredible. I would recommend this product to anyone who is interested in a DIY door upgrade. My neighbors have all commented on how great it looks. Very happy I decided to purchase and do this.
K**R
Easy
I love these. So easy and it looks great!
K**G
Turns out great as long as you aren’t a perfectionist
Update 7/6/2023: less than a year later, it is peeling. I did a lot of prep work as I had read through the other reviews and thought if I did thorough prep work that it would stick. Or not 😞 I live in MN - brutal winters and the garage is textured and in full sun. My front door (same product) that is not textured and behind a storm door is fine. But unfortunately I can no longer recommend this. 😞 I did my front door and garage door. It didn’t take that long. You do have to move briskly because it dries fast. If you are a perfectionist, pass on this product. It went much faster on a textured surface. My front door was smooth so I had to get a bit more artsy with it. When doing your garage panels, make sure to swipe all the way across the small squares. Although visitors can’t see the difference, it definitely stands out to me. Wash the doors before hand. Make sure to let it dry. Patience is not my strongest virtue, so I do have an area on the top panel where it was a too wet and left a small odd pattern. No one else seems to notice it. The front door took a lot more than two coats. I kept layering it until I got the look I wanted. It did turn out darker than the garage, but it’s far enough away it doesn’t matter. The garage door could have used two full coats but it got one coat plus spot checks. Don’t do it on a windy day. I tried everything I could do to keep the plastic down. I still got paint on my concrete. #firstworldproblems I didn’t do in between the panels and I don’t regret it. I used the mitt on the garage door (textured) but not the front door. Durability wise, I live in MN and completed this project this past fall. So, give or take five months, it’s doing well. I paired this with the magnetic “windows” and “hinges”. I think it turned out nice. I feel like it’s obvious it’s painted but all my visitors have said they thought it was real. So… I either have super nice friends or the project turned out ok. I do recommend this and I would definitely do it again. Crossing my fingers it wears/ages ok.
A**B
Fabulous, but altered the technique
Really great!! My only advice is to buy the wood graining tool and use it on the second coat (which I rolled on a little watered down version of the glaze) then use the graining tool that Amazon sells. Then, do another roll on coat of the glaze after that dries. Looks so much like wood it’s nuts!! My neighbors thought I bought a new front door and garage door.
A**R
Easy to work with and get the result
I have painted my garage doors last year and happy with result - however, the amount of primer for two garage doors are sufficient, but the actual Wood Look Paint Black Walnut was not enough to get best result.
J**A
Achieved!
The instructions was straight forward. But to achieved the wood look grain, you have to apply the wood stain several times. Other than that I have no problem...it save me thousands of dollars to replace a functional door for cosmetic reasons.
A**R
Black walnut
Definitely not a 3 hour job as they claimed, took me 3 days including prep work (wash and sanding). But I have never did this type of job before. I had to purchase 2 kits for a double garage and double front door. I chose black walnut and probably had to do 4-5 coats of top stain to get the results until we were somewhat satisfied of. If we just did 2 coats as the kit suggested it kind of just looked like a bad painting job. It was not an easy project, but I am glad I finally did it. Received some compliments from neighbour's and friends.
J**Y
The product is not for me
The idea of an all-in-one kit that would be all thought out for me seemed like a good idea. Unfortunately, the result is not a look that I would want on the front of my house. As usual, if we want to have exceptional results we have to put some time and effort into it. Doing some research on YouTube I found out some techniques that could provide that great look that I was looking for and how to do it. With a beige latex base and a mix of gel stain and clear coat (about 3 parts stain to 1 part clear coat) and a little creative artwork, you can do something worth putting on the front of your house. Unfortunately, this product is not worth the money and does not give a wood grain look, and both the seller and Amazon will not refund or help me in this matter. I lose $115 in the experience and had to find my own solution to do the job over.
K**Y
Absolute garbage! It hasn’t even been a year and it’s all peeling off of our garage!
Horrible product. Not even a year and it’s all peeling off our garage. Looks awful!
Trustpilot
3 weeks ago
2 weeks ago