We remain fully operational. Our teams are working around the clock to ensure your deliveries continue safely.

DOWNLOAD THE APP


Customer Services
Copyright © 2025 Desertcart Holdings Limited
DOWNLOAD THE APP


🍻 Unleash Your Inner Brewmaster!
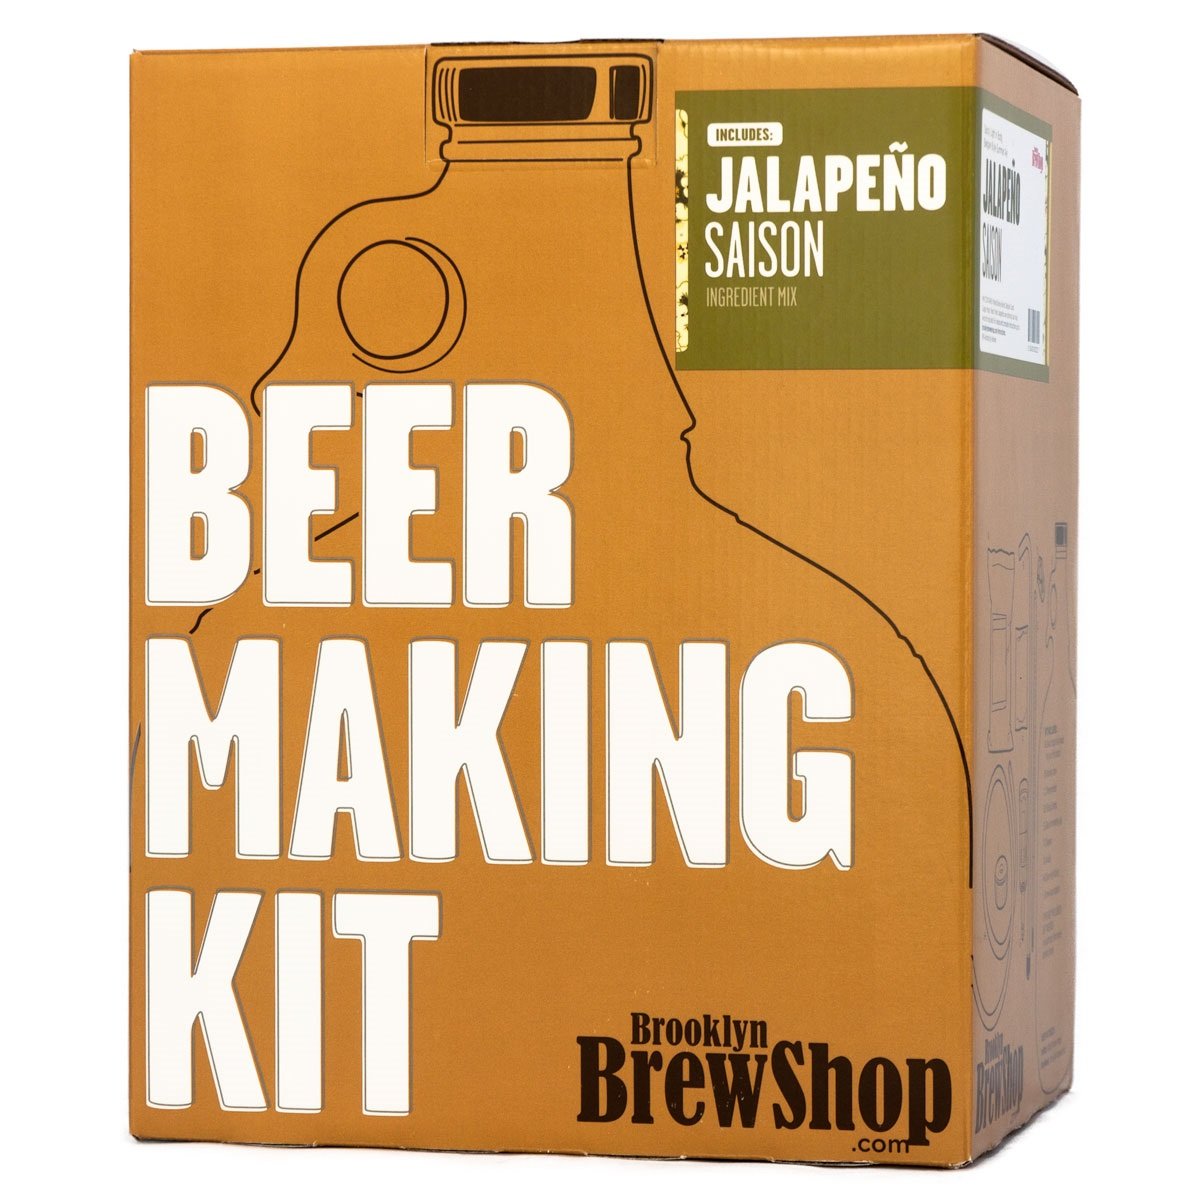
The Brooklyn Brew Shop Jalapeno Saison Beer Making Kit is a beginner-friendly brewing kit that allows you to create 1 gallon of flavorful, 6% ABV beer at home. Featuring real ingredients and an easy-to-follow guide, this kit is designed for any kitchen and has been recognized by major publications for its quality and taste.
B**O
Process is intensive but rewarding. Expect to spend about 3 hours.
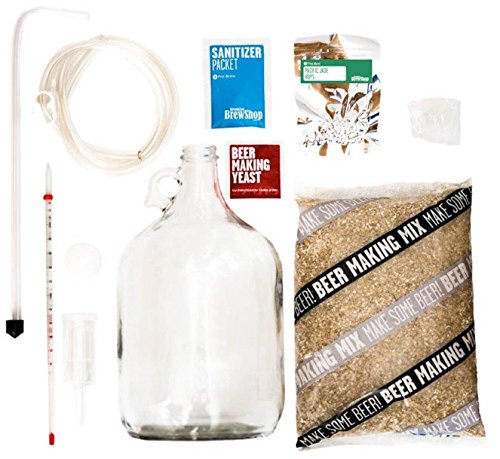
Girlfriend got this for me on Christmas, I've since brewed several batches using the equipment in this kit. Thermometer and carboy arrived intact thankfully. Instructions on the box aren't specific enough of course, you need to go on brooklyn brew shop's website and print their highly detailed instructions. (which should have been included with the kit but hey) Also, you need to go get a large mesh strainer and a stockpot large enough to hold over a gallon of liquid. And a funnel. It's also extremely handy to have a regular sized pot for your "mash" so you don't have to keep transferring and re-sanitizing stuff. It's extremely important that you READ THE DIRECTIONS. Be meticulous about your sanitizing, because heartbreak is finding your batch contaminated after a month's worth of anticipation.Helpful hints:1. After you've heated up your strike water and "mashed in", you can likely turn the heat down on your stove to a 1-2. Just remember to come back about every 10 minutes to take temperature readings, stir and add water if needed. Do not cut the mashing process short, it is VITALLY important to the strength of your beer. ALSO SET A TIMER FOR 60 MINUTES AS SOON AS YOU START.2. During the last 20 minutes of your mash, begin heating up the additional water. Make sure to read ahead in your steps to save time.3. When straining the water over the grain, I found that the grain was really sticky (likely due to the age of the grain) and you had to add water SLOWLY. My first time trying to lob all the water in at once resulted in hot grainy water overflowing onto my stove...so take it cup by cup if you have to.4. Follow your hop schedule to a T. (meaning, if it says add all the columbus hops at the start of the boil, do that)5. SET A TIMER FOR 60 MINUTES AS SOON AS IT BEGINS TO BOIL. The boil itself doesn't require excessive attention after the "hot break" where it initially begins foaming. I found that after the boil happened, you could crank the heat down a tad to like a 4-5 on my stove. This is also where your whole house may start to smell like beer so crack a window if it's nice out.6. The "force chill" portion takes FOREVER. Have patience, and do not add yeast if the temperature is above 70 degrees fahrenheit. The instructions should actually tell you to get either a bunch of ice packs or to crank up your ice machine if you can.7. After you've added the yeast and set up your blowoff tube, nothing might happen for awhile. "Primary" fermentation where everything starts going crazy may happen during the first 1-2 days so again, be patient.8. Do not open or smell your fermentor unnecessarily.9. Fermentation takes 2 weeks. Do not rush this process.10. Bottling day, if it's your first time with the gravity siphon will be a messy nightmare. I highly recommend starting off just siphoning water for practice. Or get an auto-siphon, it's really not that difficult once you get the hang of it. And DO NOT SUCK UP THE YEAST AT THE BOTTOM.11. Do not use excess priming sugar. You do not want your bottles exploding and your precious beer to be ruined.12. Allow your bottles to condition for 2 weeks. Seriously, I know it's difficult to wait but the carbonation between 1 week and 2 week is literally night and day.13. Refrigerate the night before you want to drink, don't pour the last few drops since some residual yeast will likely be there, and enjoy!This hobby is addictive, and once you get used to the process it all starts to flow together. There's a charming, almost blue collar satisfaction in drinking a beer YOU brewed or having someone else try it and go "wow, you made this?". There are also a lot of nuances that you get into later, but the fact that as a first-timer you're brewing all-grain is intense enough. Brooklyn brew shop makes an amazing kit, their marketing is extremely user friendly and I was BEYOND stoked to make this beer.EDIT: 8/2016Additional helpful hints after about 8 months and many batches of beer later:-Get a ton of ice packs and have them cold before you start. The cooldown process is important, and the quicker you get your beer to 70, the better.-If I were to do the everyday IPA kit again, I'd change the hop schedule so all of the columbus goes in at 60 and all of the chinook hops go in at 10.-Use store bought spring water. DO NOT USE TAP WATER!!!!!!!!!-Light can oxidize the beer, so cover your carboy up with a black shirt or something like that. Also try to keep it in a cupboard, closet or somewhere dark. Don't open it up to smell it.- Red Baron Bottle Capper <- Get a bottle capper with some caps. Do not use corona bottles for bottling, make sure you use amber bottles to keep light out.-The siphoning process is made easier by having a friend prevent the siphon from touching the yeast cake. Plan accordingly.-Want to make your process easier? Get an auto-siphon.-
J**R
Great Kit for First Time Homebrewers, Some Extra Supplies Needed
Summary: As a first time home brewer this kit was very helpful and a great place to start. I think one huge element that this kit brings to the table is just selling the concept of brewing 1 gallon batches (instead of the typical 5 gallon brew method). All the components of this kit are solid, but there are definitely other tools/supplies required before your first brew, and in general you can and likely will quickly upgrade to certain other tools to help make your life easier. Overall I would highly recommend the kit and love how easy it makes brewing in your kitchen.Other Supplies Required: With regard to what is included vs. what is needed, I do feel a bit mislead by the fact that the kit claims that all you need is 1 big pot to brew in. Frankly you need at least two and ideally three large pots (8qt each), so that you can be heating up water in one while mashing in the other, and then there's the need to transfer your grains into another pot in order to strain out the mash (hence a third pot). I would recommend picking up a grain bag (fine mesh bag for brewing, very cheap) so that you can easily remove the grains and sparge without a giant mess and without a third pot.Also, as others have mentioned you will likely need a large strainer to hold all of your grains while you sparge. Just a warning - you need a very large and/or deep strainer for this. I picked up a 7" strainer and it's barely enough to hold half of the grains, which made for a very messy and unprofessional sparge.Bottling: When it comes to bottling, you of course will need to supply your own bottles (poor you, you'll have to some bottled beers!), bottle capper and bottle caps, but I would also HIGHLY recommend picking up a "bottle filler". This device slides into a bottle and only releases liquid when you push down on it.The Beer: Keeping in mind that I had some difficulties in the brewing process, so I probably didn't brew the Everyday IPA to its full potential, this was still a good beer. I would not be surprised at all to buy this from a store or local brewery. I wouldn't say it's my favorite IPA ever, but for a first time brew/brew kit, I was very surprised with how nice this beer came out. Note: I did some dry hopping just before secondary fermentation and it made this beer smell amazing, highly recommend it.
A**A
Great present, great beer
Present for my husband - he absolutely loved it and has since ordered more. We have just tried the afternoon wheat beer and it was fantastic. Generally it was very easy to follow. We did find the siphon part a little difficult so have bought an automatic siphon. Glad we tried it manually first because it is all part of the learning process. The company have lots of video instructions which were really valuable. Love that it is designed for urban life - samll kitchens. Get yourself a couple of massive stock pots to help.
T**K
Birthday Gift
Delivery was lightning quick! It does come in a box with the company's logo, so if like me, you'd ordered this as a surprise birthday gift, and your hubby happens to see the box, telling him it's a birthday present for his 93 year old granny might not prove convincing! We haven't actually used it. We have had to go out and buy a few items that we need that are not included, bottles, a funnel and muslin. But the instructions are very thorough and a little scary. Am sure it will be fine once we actually get started! We? I mean he! After all it's not my birthday!
G**M
Fun process for a first timer
After some research I decided to take the plunge and try this 1 gallon brew kit. I considered other ones such as mr. beer and coopers, but after thinking about it I just don't have the space for a large 5 gallon brew. Having to boil the amount of water required was a massive drawback from those other kits.So I decided to try the Brooklyn beer kit. It came with ALMOST everything I need. In the picture everything minus the pot and strainer was included. Personally, I think its a great deal for $50.I purchased the 12 quart stock pot from superstore for $12, and the strainer from amazon.ca (https://www.amazon.ca/gp/product/B0089JCYE4/ref=oh_aui_detailpage_o01_s00?ie=UTF8&psc=1). You will also need 1 additional pot for boiling the spare water as well.The instructions were very easy to follow. If you need a video to follow there is one on youtube by Bank Street Brewery that I found extremely useful. Its not the same recipe but the process is very similar.It did take an afternoon of my time, but I found the process to be fun. Your not running around the whole afternoon, you just have to monitor the temperatures carefully. Overall I didn't find the process very challenging and I will definitely be trying out some of the other recipes or trying my own from scratch.
D**G
It came late and broken.
This product came a week later than it should have and it is also broken, the small tube like glass piece came broken into a part or two with glass shards, all over the interior of the box.
C**R
Nice to understand how to make beer
Easy!
Trustpilot
2 months ago
2 months ago