


Buy anything from 5,000+ international stores. One checkout price. No surprise fees. Join 2M+ shoppers on Desertcart.
Desertcart purchases this item on your behalf and handles shipping, customs, and support to Iceland.
🔥 Elevate your kitchen vibe with pro-level ventilation and style!
The Hauslane 30-inch Under Cabinet Range Hood combines powerful 860 CFM airflow with whisper-quiet 7 sones operation, featuring a sleek stainless steel design and intuitive touch controls. Its 6-speed fan settings and warm 2700K LED lighting create a customizable cooking environment, while dishwasher-safe baffle filters ensure easy maintenance. Backed by a lifetime motor warranty, this vent hood is engineered for heavy-duty cooking and modern kitchens.


| ASIN | B06XWFPJLH |
| Additional Features | Grease Filter, LED Lighting |
| Air Flow Capacity | 860 Cubic Feet Per Minute |
| Amperage | 2.3 Amps |
| Best Sellers Rank | #183 in Appliances ( See Top 100 in Appliances ) #28 in Range Hoods |
| Brand | Hauslane |
| Brand Name | Hauslane |
| Color | Stainless Steel |
| Control Method | Touch |
| Controls Type | Touch |
| Customer Reviews | 4.3 out of 5 stars 2,159 Reviews |
| Filter Type | Baffle |
| Finish Type | Stainless Steel |
| Finish Types | Stainless Steel |
| Frequency | 60 Hz |
| Included Components | Aluminum foil tape (1), microfiber cloth (1), oil tray (1), dishwasher-safe baffle filters (2), top 6” round exhaust adapter (1), top 3-¼” x 10” rectangular exhaust adapter (1), and rear 3-¼” x 10” rectangular exhaust adapter (1) |
| Item Dimensions D x W x H | 22"D x 30"W x 8.12"H |
| Item Form | under-cabinet |
| Item Type Name | 1 |
| Item Weight | 41 Pounds |
| Light Source | LED |
| Manufacturer | Hauslane |
| Manufacturer Part Number | PS18 |
| Material Type | Stainless Steel |
| Model Number | PS-18 |
| Mounting Type | Under Cabinet Mount |
| Noise | 7 Sones |
| Number of Speeds | 6 |
| Product Dimensions | 22"D x 30"W x 8.12"H |
| Special Feature | Grease Filter, LED Lighting |
| Specification Met | Potential HVI, Energy Star, NFPA 96 compliance |
| UPC | 861054000312 |
| Vent Hood Design | Under Cabinet Range Hood |
| Ventilation Type | Top and Back |
| Voltage | 120 Volts |
| Warranty Description | n |
| Wattage | 276 watts |
S**.
Setting the Q&A right
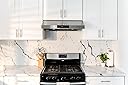
This vent hood is a beast and it's beautiful. Never thought a vent hood could be this good, or make this big a difference in cooking. Totally keeps cooking smells and grease/oils out of the kitchen. It replaced my OTR microwave, which was worthless at venting cooking odor. We bought a sub-compact microwave to put on the counter, since we never used all that microwave space in the first place. Having said all that, I feel like I need to comment quickly on the Q&A's that I have found on various other sites that sell this unit, which to me were un-true: - The display has backlit buttons to see them in the dark. As soon as the power button is pressed, the option buttons back light. For some reason, people kept saying the buttons did not. - When turning on the fan, it defaults to the last used speed. For some reason, people kept saying it defaults to high speed. If you last left it on low, it starts on low the next time you use it. - Removing the protective plastic on the filter screens took my wife and I less than 5 minutes. For some reason, people kept complaining that it took forever (one person said hours) to get the plastic film removed. It was easy and fast! Now, some observations from doing the install together with my wife: Do take a good amount of time evaluating the vent slot, if you are venting to the rear. We had to modify our vent (previously used on the above stove microwave) to get the height correct. This involved removing drywall, cutting the steel vent, hammering/forming, caulk, and copious amounts of foil tape. In addition, to get a good seal to the wall vent hole, we picked up some foam seal tape 3/8"x3/4" wide (like the kind that is used for around doors/windows). We attached this foam to the back of the vent unit. This allowed us to push the unit back against the wall and seal up the exhaust port very well. We also removed the vent flapper because our outside vent already had a spring-loaded vent flapper to keep outside air from getting into our house. To make lifting the unit up and installing easier, we removed the stove and put bar chairs under the space. Then, we could just sit and lift the unit above our heads without straining our backs. Finally, the unit has this soft, but not-too-loud, chime sound when you press the button. It just put the icing on the cake. The stainless finish matched out GE stove and refrigerator as well. Very satisfied with our purchase. Worth every penny spent. UPDATE 11/22/2020: Well, another Q&A update. I asked the question if the clock problem was fixed on the Q&A before buying. Sure enough, it still is not. My clock loses about 3 seconds a day. So about every three weeks I will be a minute off. Not acceptable for a device at this price-point. My $25 wrist-watch keeps better time than this. Wish I could just disable the clock all together. UPDATE 12/20/2021: Decided I just didn't like having the clock display at all. So, I took it apart again, removed the internal display unit, and simply put a piece of black tape over the clock section. Put the internal display back in and now I don't see the clock at all; even when the unit it turned on or off. For me, it just isn't needed. Even with the countdown timer feature to turn the unit off, I simply press the countdown timer button once and it just automatically counts down from 5 minutes by default, which is fine for me. I usually hit the countdown button when I'm done cooking and sitting down to eat. The unit turns off 5 minutes later, and I'm happy with that. I've uploaded a couple new pictures to show what it looks like now. Shouldn't take but 10-15 minutes to put the black tape modification in. Remember, this is NOT black tape on the outside of the hood unit! You have to take it apart and remove the display circuit board located BEHIND the tinted display panel. The internal display unit is held on with a couple screws, once you get the initial stainless cover part off from underneath.
R**M
A very good system which needs better installation instructions
I bought this system after comparing many systems through different web sites. I am very happy with the system (1 week after installation). The vent is pretty good in removing the fumes and looks pretty sharp in the the kitchen. Overall 5 stars even if the installation was sort of not so straightforward as the manual will make you believe it to be. Nevertheless, it can be done if you are a do-it-your self type of person with the right tools at home. The installation instructions are bare bones and not helpful when you run into problems. Best to watch lots of YouTube videos to get an idea if you want to do it by yourself. 1) The unit, though not very heavy, becomes very heavy when you do not have good support and are trying to do it alone after some time. You have to have another person helping you or it becomes a chore. Accessing the back screws for installation is extremely difficult (but there is a work around - see point 4 below). 2) Prepare a lay-out of the holes based on a template you can prepare by placing a sheet of paper on the back of the hood. Then pre-drill the holes on to your kitchen cabinet using this template. This makes life a lot easier when you are trying to put in the screws. 3) As instructed, put in the front screws first. They are relatively easy to access (even with the cooking range in place). Just remember that the longer you are bending and cramming your neck/back the more fatigue can set in. So definitely use a support (jacks or buckets with planks - there are plenty of YouTube videos to give general tips and guidance). Putting the front Screws in place holds the range in place and allows you to work on the back screws. 4) This is where accessing the back screw slots becomes a painful chore. They are recessed in such a way that they are slightly over the fan-housing and I found it best to remove the cooking range (if you can safely). With space freed up and having direct access from beneath the system (in almost a straight vertical line) allows easier access to the screws. 5) Depending on the type of cabinet you have, you may find using the screw driver manually may be better than the drill - since slow movement gives better control. However, if you have predrilled holes then it is easier with the drill. 6) Be forewarned (for older kitchen) that the rectangular vent can couple of inches off from the backside of the hole in the cabinet. My older kitchen cabinet had the hole flush with the back side and I had to cut couple of more inches to enlarge the hole in the cabinet to make sure the vent fits and sits flush when pushed all the way up. Therefore, measure before you begin. It was a good experience installing this unit. And in the end, a very good unit that has much improved performance over the older unit we had for 15 years. The lights are bright (no dimmer controls, just on/off). Other controls are straight forward and easy to use. We look forward to seeing how much the new baffle filters work - not enough time to test their effectiveness. The noise level is acceptable for a range this size and CFM - but can be loud for some. You get used to it over time.
S**.
Overall, a Good Purchase
To briefly reiterate other reviews, this is a beautiful hood, the vent is very powerful and not that loud, yes it is heavy, the installation is not easy and the instructions are not much help, but after a few uses it is so much better than the above range microwave we replaced and overall it has been worth the effort (so far, may update after more use). The lady of the house liked this particular hood, but we had to choose a model that allowed for horizontal venting out the back and there were not many options for this. After reading many helpful reviews on Amazon and watching some videos out there, I decided to take on this project. This model is fairly heavy (packaging I think says 39lbs), but it was not heavier than the GE above range microwave we were replacing. A lot of reviews and the instructions say this is a 2 person job and/or to have it professionally installed, but I did this mostly by myself so it is possible. I did not use the cabinet jacks only because I did not feel like spending the extra money for something I would probably only use once, unless absolutely necessary. Granted, in hindsight it probably would have been a lot easier with the jacks but what DIY project doesn’t come with some difficulties? If you’re willing to take on a project and you have the patience (I almost ran out during this project, but not all because of this hood) and some DIY experience it can be done by yourself. I found items around the house to stack on top of the range instead of using jacks and already had some wood for filler and some plywood lying around the house so the weight of this hood was not an issue during the installation. The instructions and the company’s video were only somewhat helpful, could have been so much better especially for this price point. Our cabinets have the recessed bottom so the instructions were not helpful for this and the hardware provided is not useful. I went to Home Depot and for $13 bought some longer carriage bolts, washers, and nuts to install the hood. The difficulties with this hood install are because of the two pre-drilled holes in the rear corners of the hood that are extremely hard to reach. This was the part where I needed help… once I had the hood up against the bottom of the cabinets I could not reach in there to mark where to drill the holes under the cabinets and then again after I drilled and put the hood up again I had to insert the bolts while my wife pulled them through. All other things being equal, the install probably would have taken 2-3 hours. Unfortunately I also ran into some issues unrelated to the hood. After taking down the microwave and unsuccessful attempts at lining up the hood I discovered that the existing vent placement in the wall did not match up to the vent on the backside of the hood, by about 3/16 of an inch on one side, so some additional cutting in the drywall and reworking the existing vent was required. And I retaped and applied just a bit of AST sealant tape. After several rounds of trial and error everything was lined up perfectly. If you don’t like a good DIY project, save yourself the frustration and perhaps hire someone to install this for you. Or spend the extra money and go with the cabinet jacks. After our first day of use, this works great. With six venting levels, the first level does not make much noise, the second level is comparable to what our microwave made, and three through six are all about the same level of loudness but still not much louder than the microwave. Definitely much better venting than the microwave so even if this hood is a little louder than the old microwave vent, it’s worth it. May report back with more updates after a little more use. I think 5 stars might be a little premature with only one day of actual use, definitely a little pricey, and I have to think the install could have been made a little easier, so 4 stars for now. But overall a good purchase.
C**S
Good item
I’m extremely satisfied with this range hood. It has a powerful suction that effectively removes smoke, grease, and odors from the kitchen, leaving the air fresh and clean. The design is sleek and modern, fitting perfectly with my kitchen decor. It operates quietly, which is a huge plus, and the controls are simple and easy to use. Overall, it’s a high-quality product that offers great performance and excellent value for money. Highly recommended!
A**R
High Quality Hood - Looks and Works GREAT
I had my eye on this pre-pandemic, and I couldn't say No when I saw it on Amazon for the same price AND with $100 off for signing up for the credit card (SO glad I waited for a big purchase to get it. lol). I looked at a ton of hoods, and it seems that there is a huge lack of mid-ranged hoods as far as price vs quality. This is priced wonderfully even if it is not on sale (about $400 usd at the time...minus another 100 for me). It has an amazing, quality, sturdy construction and comes with several options for installation so that you shouldn't need to buy anything additional. The suction power is insane on high levels but is also loud on the higher levels. If I want to talk while cooking or listen to music or something, then I keep the fan on 1 or 2 bars with no issues whatsoever. I absolutely love the removable baffles and grease trap which can all be run in the dishwasher. The grease trap even has a little window to see how much is collecting in it just in case you are super lazy and only want to wash it out every year or less (haha...likely will be me). The lights are bright enough that I use them as ambient kitchen lighting at night since they are such low watts and the bulbs are REPLACEABLE!!! Yeah, I am excited about that since a lot of hoods with LED lights do not have this option. This hoods looks amazing as well. I did install this myself which was quite a task due to the weight and a few of the design choices (like where some screw slots/holes are located). I am not the handiest man, but I can hold my own. You will need at least one other person or maybe a cabinet jack (which I do not have) or both. I had to buy some sheet metal and make my own rectangular 45 degree elbow of duct work (since that is not a piece normally manufactured in the HVAC industry, apparently) with tins snips, sheet metal screws, aluminum tape, and duct tape. The manual and directions are excellent as is the packaging. This is one of my favorite upgrades I have ever done in my house. I will definitely look at Hauslane first for hood replacements in the future, and this model is at the top of my list. Oh, and when you press the control pad for different functions or to turn it on or off....it has the most pleasant chime/sound effect that I could possibly imagine. Seriously. lol I am not being endorsed for this review by anyone in any way. I'm an RN which makes me one of the most trustworthy occupations (if the surveys can be believed, haha), and I believe that if you jive with what I have written here, then you will NOT be disappointed with this hood. Just consider hiring a handyman to install it if you aren't ready for a project. I hope this review is helpful!
I**N
Quality unit that delivers for its premium price
It was a choice between this PS18 and the PS38. I wasn’t certain how well the self-cleaning on the PS-38 would be and the baffle filters on the PS18 can easily fit in the dishwasher, so I opted for the PS-18. I’m very happy with the choice. Install wasn’t difficult, but was somewhat challenging to get the hood in place while also trying to line up the vent and get the vent connected all at the same time. Then again, I chose to install by myself. I’ve done a lot of DIY projects, so can figure out how to do things safely by myself, but I wouldn’t recommend it—use two people if you have the help available. The unit is very sturdy. Especially the fans. No cheapy fans in this unit (compared to most of the units available at big box stores). It’s not the most elegant looking, but function was way more important to me than stylish looks. And I wanted something to last. One thing to note, if you’re going to run this at max, either your HVAC system needs an ERV, or you need to open a window just an inch. This is especially true if you have an energy efficient home that is well sealed up. If not, you will not get the air flow as you will just be creating a vacuum in your house. The one thing that is slightly odd with the controls is that if you want to shut off the fan, it seems the only way is to tap the power control, but that then also turns out the light. In 2 months, I won’t even notice this. Overall, I’m very satisfied and would recommend this vent hood.
C**Z
Disappointed
Updated 2020-11-01 It does stick out 9 inches or so. If you are a taller person, it may be in the way. The two setting of brightness is not very helpful and annoying that you need to tap twice to get to the brighter setting. The bulb burnt out after two years. Replaced with LED bulbs. They flick especially at the lower brightness setting even with the better dimmable LEDs. It works well in general but some grease can escape from the sides. If you have cabinets right next to it, the cabinet walls will get greasy over time. The grills are extremely difficult to clean. Quite disappointed with this purchase so far. It is never a good sign when the package arrives all beat up. Probably should've returned it right then. What if the product is fine? I'm paying for the actual product not the packaging, right? No such luck. Took it out and noticed a huge dent on the front panel. At that point, good luck trying to put it back in the way it was. Well, I had it out. Might as well check it out. For what this hood costs, the craftsmanship is not acceptable. Many panels seem warped. Maybe it was fine out of factory and got damaged in transit. Once installed, some of them probably won't get noticed. Try to look beyond those. What is this? A busted LED bulb!? Must be hell of a ride to my door step. Installation is usually pain in the ass. Better plug this in to see if it works before hanging this up. Turned the fans on and immediately heard the noice that was definitely not supposed to be there. It sounded like a classic clunker. I was this far into it. A stupid fan that was not properly assembled was not going to stop me. Took the grill off. Took down another panel. Got access to the fan. Gave it a spin. Sure enough, it was on crooked. Loosened the screw and adjusted the fan. Tightened it back up. Noise is gone. Time to mount it on. Let's see what the instruction says. Absolutely nothing worth while. I was on my own. There are 4 slot holes. So the screws can be screwed on half way and hood can be slided on. While it is hanging, screws can be tightened all the way. What a fantastic concept, right? Unfortunately, I have 6" round duct. So have to connect to the top of hood. The duct adapter piece is about 1" tall. Can't slide with that baby sticking out. Have to align the 6" hole then fasten the screws. Would it kill them to include a 1:1 scale template with the screw hole and exhaust hole location? Probably not but why risk it, right? Oh, the cord. Why is the cord so close to a mounting hole? Did the designer not understand that a clearance hole was needed for the cord and a screw needed to screw into something? Just had to drill or cut everything perfectly. Boy, would a template be nice. Clearance hole cut, mounting hole pre drilled with pilot holes. Time to mount this beast. After a few hours of holding the hood awkwardly and playing twister with a buddy, I finally did it with some help. Only thing to do now is just to figure out how to adjust the clock. Hm, the clock button doesn't work. Let's check the manual. Oh wait, that is actually useful information. Why would it be in the manual? Is the button malfunctioned? Well it works with the fans on. It allows to sets a timer for the fans. I guess I'll just check the Q&A section. There are five different fan levels. Noise level is acceptable with the highest speed. Will follow up on how well it works after some usage. Will upload some pictures and videos later. Bottom line, this might be an awesome range hood but I had a terrible experience so far. The manuals need some serious improvement and every designer/engineer of this product should install 10 of these for each configuration before launching the product. Hire someone else to suffer the installation. If that is not in the cards, get another person to help because it is a 2-person job. Make a template. Make a simple jig with car jack and 2x4s. Get some 6" bits if using drill driver. Wish everyone better luck.
E**E
Decent product, very tricky installation
Not designed for standard dimension prefab cabinet boxes. The operation is good so far. This review is mostly about the installation process. Note: I have a prefab 30" cabinet box with 1/2 in. side and a 3/4 in. recess below the bottom. I used 6in round ducting to vent the unit outside through my kitchen wall. The hole necessary for the power cord is partially blocked by the cabinet side. Which is a problem because the power cord is immediately adjacent to a mounting bolt hole. This did not leave much material for the mounting bolt. So far it hasn't been a problem but I just installed this yesterday. Either way, it made the install extra awkward having to work around theounting bolt and power cord simultaneously. The six inch adapter is not tall enough. With a 1/2 in thick bottom and a 3/4 in spacer, the adapter is just below the surface inside the cabinet. I have to cut away significant extra material around the exposed adapter just to be able to install and seal the duct which can't be installed before the unit is mounted. The provided mounting bolts are way too long. Even with a 3/4 spacer, the bolt still protrude into the inside of the cabinet box 1/4 to 1/2 in.
G**T
An industrial beast.
I looked at and researched hood vents for longer than I care to admit. Home depot, best buy, Brick ect ect. Almost every vent I looked at was flimsy, lightly built and kind of cheap with reviews to match. I really wanted something built in Canada or at the least in the USA. No dealers around this area for the Hauslane products but I did my research and read many many reviews. I am really happy that I did. This is by far the most industrial good looking well made hood that I have viewed at any price point. Even the optional venting systems provided with this hood are built way beyond my best expectations. Solid with an incredible foam rubber gasket attached to them. This thing weights 40 pounds, and might need 2 people to install. It comes with cord that has a plug on it, our old vent was hard wired so we needed to install an outlet in the cupboard above the vent. Our kitchen is set up for direct venting out the back of the hood, Built in 1987 the exhaust to the outside of the house did not fit the supplied vent with the Hauslane. This was not a huge problem as this company provides 3 options for venting and we easily adapted the 3x10 inch top vent to our purpose. Gasket was attached already, installation was complete. Easy to bring to life and program this product is a joy to use. On low settings it is very quiet, on the higher setting it can be heard but is not annoying. You can not move the incredible volume of air these twin fans move with out some sound. The LED lights are perfect, not a harsh light but bright and warm allowing you to see exactly what you need to when using the stove. The touch screen controls are responsive to the lightest touch and are perfect and simple. Do not hesitate to buy this product, if you can afford this price point it will not disappoint you. Hauslane is not messing around with with cheap price point garbage. I only wish I could get all my household needs supplied by this company.
K**N
Quiet and very well built
I purchased this December '23. It made the perfect puppy gate for the first 6 months for a puppy that arrived on Dec 27. Last week, I finally installed it (the puppy is now over 2 years old). This hood fan is very well built, beautiful and most importantly, quiet on lower speeds. It also comes with a couple rectangular adapters and a round 6". The lights are incredibly bright, something I didn't know I was missing. I regret not installing it sooner. I love this thing!
P**A
High quality, low sound
This unit is very nice. The unit itself was easy to install (once I got the hole in my wall lined up). but lost one star because the rectangular part that I needed to put on the back didn’t line up with the screw holes which it said it should so I just had to drill them in and make new holes. Didn’t effect the unit but still. Also I found the top round cover it very thick and didn’t allow us to install it flush with the cupboard, so I had to remove that and put aluminum tape instead. If these 2 issues were fixed I’d give it 5 star. However even with these issues I’d buy it again. Very nice and installing wasn’t that hard but you do need 2 people to hold it and one person to screw or in. Or one strong person to hold it. It’s about 35lbs. - instructions are great. - sound is great. On the low setting it’s about 45 decibels and on high is about 65 if you are standing right beside it. My previous unit was 65 on low so this is a big improvement. I can actually talk to someone when it’s on the first few levels. On high it’s louder but nothing to bad. You can still talk. - Suction is great even on low. Easy to change the lights out if needed, but so far they are good. - clock for some reason shows the zero at front when there’s no need for that. Setting the time was simple. Took a few seconds . Only had for a couple days now, oct 2022, so will update review if anything changes.
L**I
Would give it 10 stars!
Finally installed this range fan. It’s absolutely amazing! Super quiet and powerful. Looks amazing. Installation was a bit challenging but since we’re not professionals that was to be expected. Bought a pair of cabinet jacks that definitely helped. Reinforced cabinet with a couple of pieces of 1”x4”s and used bolts instead of the screws provided.
K**1
Hang on
We love this range vent hood. The suction is amazing. We normally use it on level 3 or 4. I think level 5 would implode the house. In all seriousness, this hood looks great installed over our range. It vents great and is easy to clean. It is a bit loud on level 4 and 5 which a few reviews said but not enough to be annoying. It was heavy to install, we used a car scissor jack on planks across the gap for the range to assist us, you only have to keep it balanced. The holes for the screws are tricky but not impossible to reach. I recommend moving the range out from under the cabinets so you can get directly under the hood when you install it. We love it, works great and looks. The kids love the little tornados that form in the steam when the unit is on 5.
Trustpilot
5 days ago
4 days ago