


Desertcart purchases this item on your behalf and handles shipping, customs, and support to Iceland.
🛠️ Fix it fast, fix it right — never fear stripped threads again!
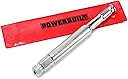
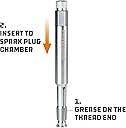
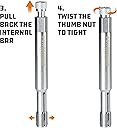
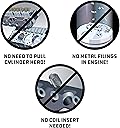
The Powerbuilt 14mm Back Tap Spark Plug Thread Repair Tool is a professional-grade, collapsible tool designed to restore damaged spark plug threads efficiently without removing cylinder heads. Made from heat-treated 4118 steel and meeting ANSI standards, it expands inside the spark plug hole to clean and repair threads while capturing debris, saving time and costly engine repairs. Trusted by mechanics and DIYers alike, it offers a lifetime warranty and is a must-have for any serious automotive toolkit.



| ASIN | B0014FGVVW |
| Best Sellers Rank | #45,808 in Automotive ( See Top 100 in Automotive ) #39 in Thread Metric Inserts & Repair Kits |
| Brand | Powerbuilt |
| Brand Name | Powerbuilt |
| Color | Silver |
| Customer Reviews | 4.4 out of 5 stars 2,053 Reviews |
| Global Trade Identification Number | 00028907263274 |
| Included Components | 14 Millimeter Back-Tap Thread Repair Tool |
| Item Dimensions | 5 x 0.75 x 10 inches |
| Item Weight | 0.16 kg |
| Item dimensions L x W x H | 5 x 0.75 x 10 inches |
| Manufacturer | Powerbuilt |
| Manufacturer Part Number | 640811 |
| Manufacturer Warranty Description | Lifetime |
| Material | Chrome Molybdenum |
| Material Type | Chrome Molybdenum |
| Model Number | 640811 |
| Number of Items | 1 |
| Number of Pieces | 1 |
| UPC | 740528465287 028907263274 |
| Unit Count | 1 Count |
H**R
This thing works! Great tool!
I was hesitant to order because there were some negative reviews, but since I'd already stripped the threads in my generator's engine and needed something, I went with this one. And it worked perfectly. If you want great results, take your time and play with the thing. Learn how it works. Snap it fully open, pop it closed again, slowly open it, all that stuff. Work with it. First of all, you want to make sure it works before you put it in your engine; if those expanding thread pieces are going to break off (like one review said), then you definitely want that to happen OUTSIDE your engine! But you want to play with it to see where the knob engages, where the expanding plunger stops spinning and starts gripping and spreading the threads outwards, etc. Second, do NOT put grease on the expanding plunger. You need friction there, you want it to grip the inside of the expanding thread "leaves" or whatever you want to call them. Grease up the threads plenty, you need that grease, but don't put grease where it can get on the inside of the leaves. Third, go slow, take your time, and as you're removing it and cutting new threads, if it suddenly gets a whole lot harder to turn, don't just force it through. Back it off a little. Reverse it and thread it back in maybe 1/4 turn, and then reverse it again and try removing it again; you will probably find that it works smoother the second time it traverses that same spot. What's happening is that as it's cutting new threads, chunks of metal are getting caught in the threads and binding up. You don't want to just force your way through that. By reversing and backing up, it lets those chunks of swarf get caught in the gaps between the four expanding "leaves", getting them out of the way of the threads, so it's much smoother to remove the second time you try to pass that same section. Fourth, go in a few passes. Don't expand it fully the first time you try it! Do like the instructions say, expand it some for the first run but not all the way. For my first run I tried to make the grooves between the leaves basically parallel, so the threads were pretty much even over the whole tool. Remember how many turns of the screw it takes to get it to that size. Then minimize it, grease it up, put it in, expand the leaves to that same size by backing the screw out to that same size, and extract it slowly from the socket. Then clean it up, get all the grease off it (especially between the leaves, where most of the swarf will be), and then split the difference between the expansion size you had (where the grooves are parallel) and the fully-expanded size. Find that middle ground, remember the number of turns of the knob necessary to get it to that size, and then minimize it, grease it, etc, same a the first pass. Then clean it off and grease it up and get ready for the final pass. Put it in the hole, hold the tool down with a wrench of the right size, and yank the rotating knob as far out as it will go so the leaves snap fully open, and then extract it once again, backing off when encountering higher resistance and then going forward again. Once you get it fully removed that third time, you should have perfectly functional threads again in the spark plug hole. I can tell you I did. For getting rid of the grease, I used the red can of Brakleen (chlorinated), and it washed the tool spotless. I hope to never use it again, but am very glad I have it. Really saved my neck (and my generator).
J**A
What a great invention,
I want to thank the inventor on such a great tool, this was a life saver. I wanted to change the plugs in my 2018 GMC Serria 5.3 and when I got to the third plug on the driver's side out with ease and install the new one with the steering shaft partially in the way was a tight fit to turn the plug more than 2 turns or so by hand, I went for the spark plug socket and the long extension to reach and apparently, I had it cross threaded and tightened it till it was tight and torqued it to 15ft lbs. looked up after the spark plug socket was removed and it looked crooked. it was an oh no what do I do now. off to the auto parts store to get a 14mm thread chaser got it home and tried it and could not get it started said what the hell, now I went to the internet to see if there was a tool like this and wow there was the answer I said. I did some Hims and haws and said if this does not work it's going to cost me huge!!! So, I purchased it and the job to fix the threads were ease with time & patience. I would need to have the head taken off, at shop at a cost of at least 1000 $ plus to get it repaired and a what an inconvenience. For the cost of this tool, it was worth every penny/dollar, and it worked to fix it in two passes. Phew what a savior. if you are like me having doubt with this tool, say to yourself what do I have to lose a little money or a huge bill when it's all over. so, take the chance like I did and have a great outcome. A BIG YES, IT'S FIXED!!!!
D**A
Patience is a virtue
Worked great, just take it slow and increase thread size slowly! Most bad reviews of this are improper use or trying to fix threads that are too far gone. Mine had two threads at the beginning of a spark plug hole that were bugged up. This worked great to straighten those out and saved me from needing to Helicoil/Timesert. Size was perfect as described. It was easy to use, built really well, and made a potentially 10 hour job a 1 hour job.
T**E
Worth every penny!
This little tool is worth it's weight in gold! Had a JD mower come in with a cross threaded spark plug hole. This tool goes in with some grease to collect any shavings and lubricate. Make sure it's straight. You can feel when backing it our when it engages the threads by hand, and it will turn smoothly. Gradually tighten the screw and back it out by hand until it starts to get tight on the damaged threads. Use a wrench and gently bring it out. Takes about 3 times, each time adding a little more tightness. when you have the tool fully engaged, it wont tighten up anymore, you should still be able to back it out by hand until it gets to the damaged threads, then work it back and forth gently with a wrench. It'll take some time. Don't force! It is doing it's job. You will feel it getting easier each time you turn it back and forth. After you have it out, clean up and hand start your spark plug and you can tighten up to the gasket by hand, then snug properly with a socket. Done! This is a very good tool, works well. Note: Just don't get too much grease on the cone shaped wedge that expands the threads. It needs some friction in order to tighten up and expand the cutters.
R**N
Too short for me but made it work
I managed to cross a couple threads near the top on a Porsche 986 when putting in a plug. They were damaged enough that I needed to fix them. Ordered this tool in 14mm. As others have said, take your time and experiment. One thing that helped me was setting the diameter for insertion by tightening until the threads just barely caught and then easing it off a bit. Now, to my main issue. It's about 1.5 -2 inches too short for the Boxster. I couldn't get enough pressure on the knurled knob to be able to tighten it once the tool was bottomed out as the top of the tool was below the top of the cylinder cover. My solution was to take a heat gun to a failed 3d print that I had of pc-cf material and melted some around the knurled knob and then put a deep 13mm socket around it and onto the hex nut at the top of the tool to mold a nut over the knurled piece. This left me with the ability to grab the knurled piece with a deep socket to adjust it and then slide it all the way over to turn the tool for chasing the threads. After a couple hours screwing around I got it to work and have some nice clean threads. I definitely saw metal bits on the tool afterwards which kept them out of my engine. Will see afterwards if it results in any that fell in.
J**Y
This is an awesome tool glad I found this
I'm doing this comment today to help others after reading all the bad comments. I bought a 2007 Ford Ranger with 200k miles on it. Back some 100k miles ago someone replace the spack plugs did ok with the first 3 plugs but the 4th was badly crossed into the head. See first pix the rusted plug is #4 . What a mess it was leaning to one side so the wire wouldn't plug all the way into the valve cover. The engine is a 2.3l DOHC inline 4 cylinder engine. First off is you have to bring the piston up to top dead cylinder just #4. See 2nd pix. I didn't have much room to work with. I used infor from a Mark C. and cut a slot in the top of the shaft just enough to catch with a pocket screw driver. I counted the turns 5 1/2 complete turns from bottom to all tight. I lubed the threads with synthetic grease. Inserted to tool all the way and tighten the nut 1 1/2 turns extracted it slowly back and forth 1/8 movement until it came all the way out of the cylinder turning counter clockwise. Clean lube and loosen tool reinsert into the s-p hole with more grease. Tigthen 3 complete turns and slowly extracted. Repeat third time at 5 1/2 turns counterclockwise till it came out of the hole. Then I chase with my second s-p chaser by hand to check ease of turning. Installed #4 spark plug. See third pix tools still like new. Repeat 1, 2 and 3 with my second chaser by hand now all 4 spark plugs goes in correctly. Done. The tool was not easy to use. The shaft Is to short even tighten all the way doesn't come thru the nuts. The shaft needs to be longer maybe 1/4 inch. Then the tool should be offered in two sizes an inch shorter for those tight places and maybe 2 inch longer for those 4 valve cylinder you know the dual cam heads. If it was longer then maybe I wouldn't have to remove the valve cover, intake and all that I had to remove to use this tool. Then I can't use a socket on because it wouldn't go over the nut. Had to use an open end wrench at an angle to turn the tool. jesss On cast iron heads this tool may not work well. Recommend 1/2 turn of the nuts of the shaft at a time with 7-8 pass thru. The key is working slowly. Anyway what worked for me may not work for you. I'm so glad I found this tool. It saved me from pulling the head and I feel that on the next tune up everything will be just fine. I was scared to use this tool because of all the negative comments. Now that I'm done I'm glad that I gave it a try. So worth the money I suspect those others should not be working on engines. Can't be forced have to work it slowly.
C**T
If you thought your life was over, this tool gives you hope.
I've never written a review on anything in my life. I've never even stayed on the phone to give a review of the customer servicer... but, this little handy thing molded me into a reviewing expert and you must know about it. Here's my situation and I can only assume it's nearly yours: I have a 2010 Ford Explorer XLT on which I have done the maintenance myself. Never a big deal, any idiot can change oil... I thought any idiot could change plugs too but apparently I'm a special kind of tool. Brakes done, filters all done, belts done... you get the drift. There I am jamming to my 80s classics and got 4 of the 6 plugs replaced along with their cables. Psh... this is easy. Then, everything changed. I can always tell you where I was when I cross threaded my spark plug insert. 5th one out but no matter what I did, I could not... COULD NOT... get the new one in. Heck, I couldn't get the old one back in.... simply would not catch. Hours I spent out there learning and creating new profanities and tying them together like a drunken sailor... I'm just happy my 3 year old wasn't there for this. As you know, it wasnt even my fault. Who uses aluminum heads? I mean, who cares if they are ligher, promote combustion, easier to produce, cheaper... all dumb excuses when one can cross thread the insert. Should have been steel like the "good old days" (that I dont actually know about). All my prayers went unanswered... I tried to ask all of the Heavenly Host for help, "If you let this in, I'll stop... (well, you don't need those details). Nay, it wasn't meant to be. To AutoZone I said... and my wife's chariot escorted me to the land of all the answers... "helicoil"; "go to Ford"; you're SOL"; "giggles". Any of these answers are expensive or time consuming. Hours of internet searching... nothing. After several conversations with my earthly father... (an actually smart aircraft mechanic)... he found this gem. Hope. The glimmer was there when I watched the videos and saw it in action... easily ordered it. Here in two days. I've spent so much money on things I dont remember, things I may be ashamed of... we all have. This though, this magical little piece of American ingenuity... this is the best $30 I have spent in my entire life, per capita. Even better than that one time in the Philippines. I put this "save the day" tool in, expanded once and it caught immediately. I reduced the size (simple) and greased it up... ran it through the insert three times expanding it more each time and cleaning it after each use. "Here goes nothing" I said... the new plug found its way home on the first tuen. No resistence... it was finally accepted. Just like we all want to be. Maybe that was my prayers being answered. Maybe this is just how life is. But I'm going to take the ATLEAST $1970 saved thanks to this tool and donate to a good cause... Hope is what we need. This tool does it. Even if you dont need it, buy it. Buy it for that hope. Because if you ever need it or, even better, a friend needs it... you will never hear the end of your greatness. And acceptance. Off to drive.
F**K
Saved me time & money but was harder to use than expected.
This reverse tapping,"thread chaser" worked almost exactly as described. WHAT I WAS UP AGAINST: I had a partially damaged spark plug thread, in what I presume is the usual position of near the "top-lip" of the spark plug shaft, caused by a previous owner who I think tried to screw in a spark plug at an angle with some kind of air powered socket wrench. The cross-cut thread damage done by this resulted in every attempt to screw in a spark plug ending with the engagement of the mis-aligned cross-cut threads that were created by the previous owners poor alignment job. On this damaged helix track of threads you'd get maybe 1-3 full 360 degree turns of the spark plug and then be greeted with the full seizing of the process. When faced with the alternative excessive method of repair, as what I had was, what would still be described as 80% of entirely undamaged threads. I went with this ingenious "thread chaser" as I really did not want to start completely drilling out all the existing spark plug threads, then re-threading that shaft & then go putting in a "helicoil"/"timesert" insert,(Not least because of all the swarf it would create, as I would also be faced with not being entirely convinced I would be able to drill out the spark plug socket without first having to take the whole engine head off, [to ensure the hole drilled would be at the correct angle etc.] Moreover I've also read that helicoil inserts can interfere with the combustion chamber chemistry resulting in knocking/detonations.) IN USE: It took me more than the 4-5 passes that are suggested on the packaging to fully "re-thread" the damaged section. While progress was slow and I must have done 10 passes from the bottom up, primarily all by hand-twisting this reverse tapping tool, with only slight assistance from a socket wrench(torque lever) during the last 3 passes. With the rationale behind this being that I was seriously concerned, that this thread chaser would not engage with my existing threads and instead cross-cut/damage them too, if I relied too much on brute force. So I used the least amount of torque possible, hand-turning for the majority of the time and just gingerly applying my socket wrench when I was fairly confident that I had engaged my pre-existing bottom threads and was just about beginning to start bumping up against the damaged section that needed re-tapping. For example, there was one hand pass that I was doing were I felt I hand encountered resistance far too early(meaning I was just about to cut into fine pre-existing threads) and I simply backed out and started again. With no issues. If I had been using my socket wrench, you can imagine that I might not have felt that, this was the case, until a little cutting damage had already been done. I would also advise to check the torque/tightness of your spark plug on a daily basis once you're finished and driving around again, as it the plug might work loose & may especially need re-tightening after the first days travel. Mine didn't, but better safe than sorry for you high compression ratio gearheads out there! I was also thinking about applying some Loctite 620 or Permatex High Strength Sleeve Retainer which are designed for these kind of environments, to the top 20% of loose re-cut threads, that is, if I ever grew concerned for the pressure handling ability of just 80% of threads. It is a pity that the designers of this tool "powerbuilt" don't recommend a thread sealant!
K**.
Quality product. Safely chase out spark plug threads without taking the cylinder head off!
Brilliant design. Life saver when changing old spark plugs that have been in an alloy head for 25 years! (so the cylinder head threads are not in great condition). Perhaps the whole tool could be an inch longer, but I just used a long 1/2 inch socket as an extension. The knurled nut is a bit tricky to tighten up when you're up to your elbows in engine bay. Nevertheless I managed to chase out 4 spark plug holes on an ML430 where the engine bay is very tight on one side. A couple of the plugs were very hard to get out due to binding with the thread in the cylinder head, but after running this tool through them I was able to screw in the new plugs by hand (before torquing up to 25nm). I still have 12 more to do (there are 16 plugs on that engine!) and I'm considering cutting a slot in the end of the knurled nut so I can tighten it with a flat blade screwdriver. Make sure you apply a smear of sticky grease to the thread tap so that it collects any debris as you wind it out of the head.
R**Y
Save a lot of money
I call this tool ''Tool doing miracles'' I purchased last february 15 2022 a used John Deere Lawn tractor with snowblower attachement. 6 weeks later I wanted to inspect the 2 spark plugs. The one at the right was OK just need a minor clean. Reinstall was easy. However the left spark plug was not that easy to reinstall because threads were stripped. After reserches I landed on this wonderful tool sold by Amazon. As soon as I have received it I rush to my tractor and did the job as recommended by the manufacturer. 3 passes were necessary and the thread came back as good as new. This tool at the end cost barely nothing because it will save you pain, tears and stress and lot of money. Install the tool in the spark plug hole up the end of threads, turn the adjusting screew to give some expension (3 passes) last pass at full expension. Turn slowly until it pops out and start next pass. The good thing compare to other tools (taps) is that you won't start repairing the threads from the outside and gradually going inside.....no, this tool starts from inside coming outside the hole gradually...... Wonderful. Who's the inventor???? He's awesome!!!!
J**A
Excelente calidad
Excelente producto la dejo como nueva!
K**6
Bra verktyg
Om man inte vet hur verktyget ska användas, kolla Youtube. Slapp köpa ny motorsåg.
A**D
Very good tool
It help my to rethread spark plug dameged thread on my Toyota prado
Trustpilot
2 weeks ago
1 month ago