

Buy anything from 5,000+ international stores. One checkout price. No surprise fees. Join 2M+ shoppers on Desertcart.
Desertcart purchases this item on your behalf and handles shipping, customs, and support to Iceland.
๐ก Elevate your outdoor lifestyle with a gazebo thatโs as tough as your schedule!
The Outsunny 10' x 12' Hardtop Gazebo combines a powder-coated aluminum frame with a galvanized steel roof to deliver a durable, weather-resistant outdoor pavilion. Featuring mosquito netting and privacy curtains, it offers a comfortable, bug-free environment for up to 10 people. Designed for versatile installation on various surfaces, this modern coffee brown gazebo is perfect for enhancing your garden, patio, or backyard with style and lasting protection.


| ASIN | B06XGS9346 |
| Best Sellers Rank | #312,088 in Patio, Lawn & Garden ( See Top 100 in Patio, Lawn & Garden ) #873 in Gazebos |
| Brand | Outsunny |
| Brand Name | Outsunny |
| Color | Coffee Brown |
| Customer Reviews | 4.3 out of 5 stars 736 Reviews |
| Frame Material | Aluminum |
| Included Components | Ground Nails |
| Item Dimensions L x W x H | 143.75"L x 103.25"W x 103.25"H |
| Item Type Name | Gazebo |
| Item Weight | 209.44 Pounds |
| Manufacturer | Aosom LLC |
| Material | Alloy Steel , Aluminum |
| Material Type | Alloy Steel, Aluminum |
| Occupancy | 10 Person |
| Product Dimensions | 143.75"L x 103.25"W x 103.25"H |
| Required Assembly | Yes |
| Shape | Rectangular |
| Style | Modern |
| Style Name | Modern |
| UPC | 842525105323 |
| Ultraviolet Light Protection | Yes |
| Unit Count | 1.0 Count |
| Water Resistance Level | Water Resistant |
I**I
Absolutely beautiful gazebo
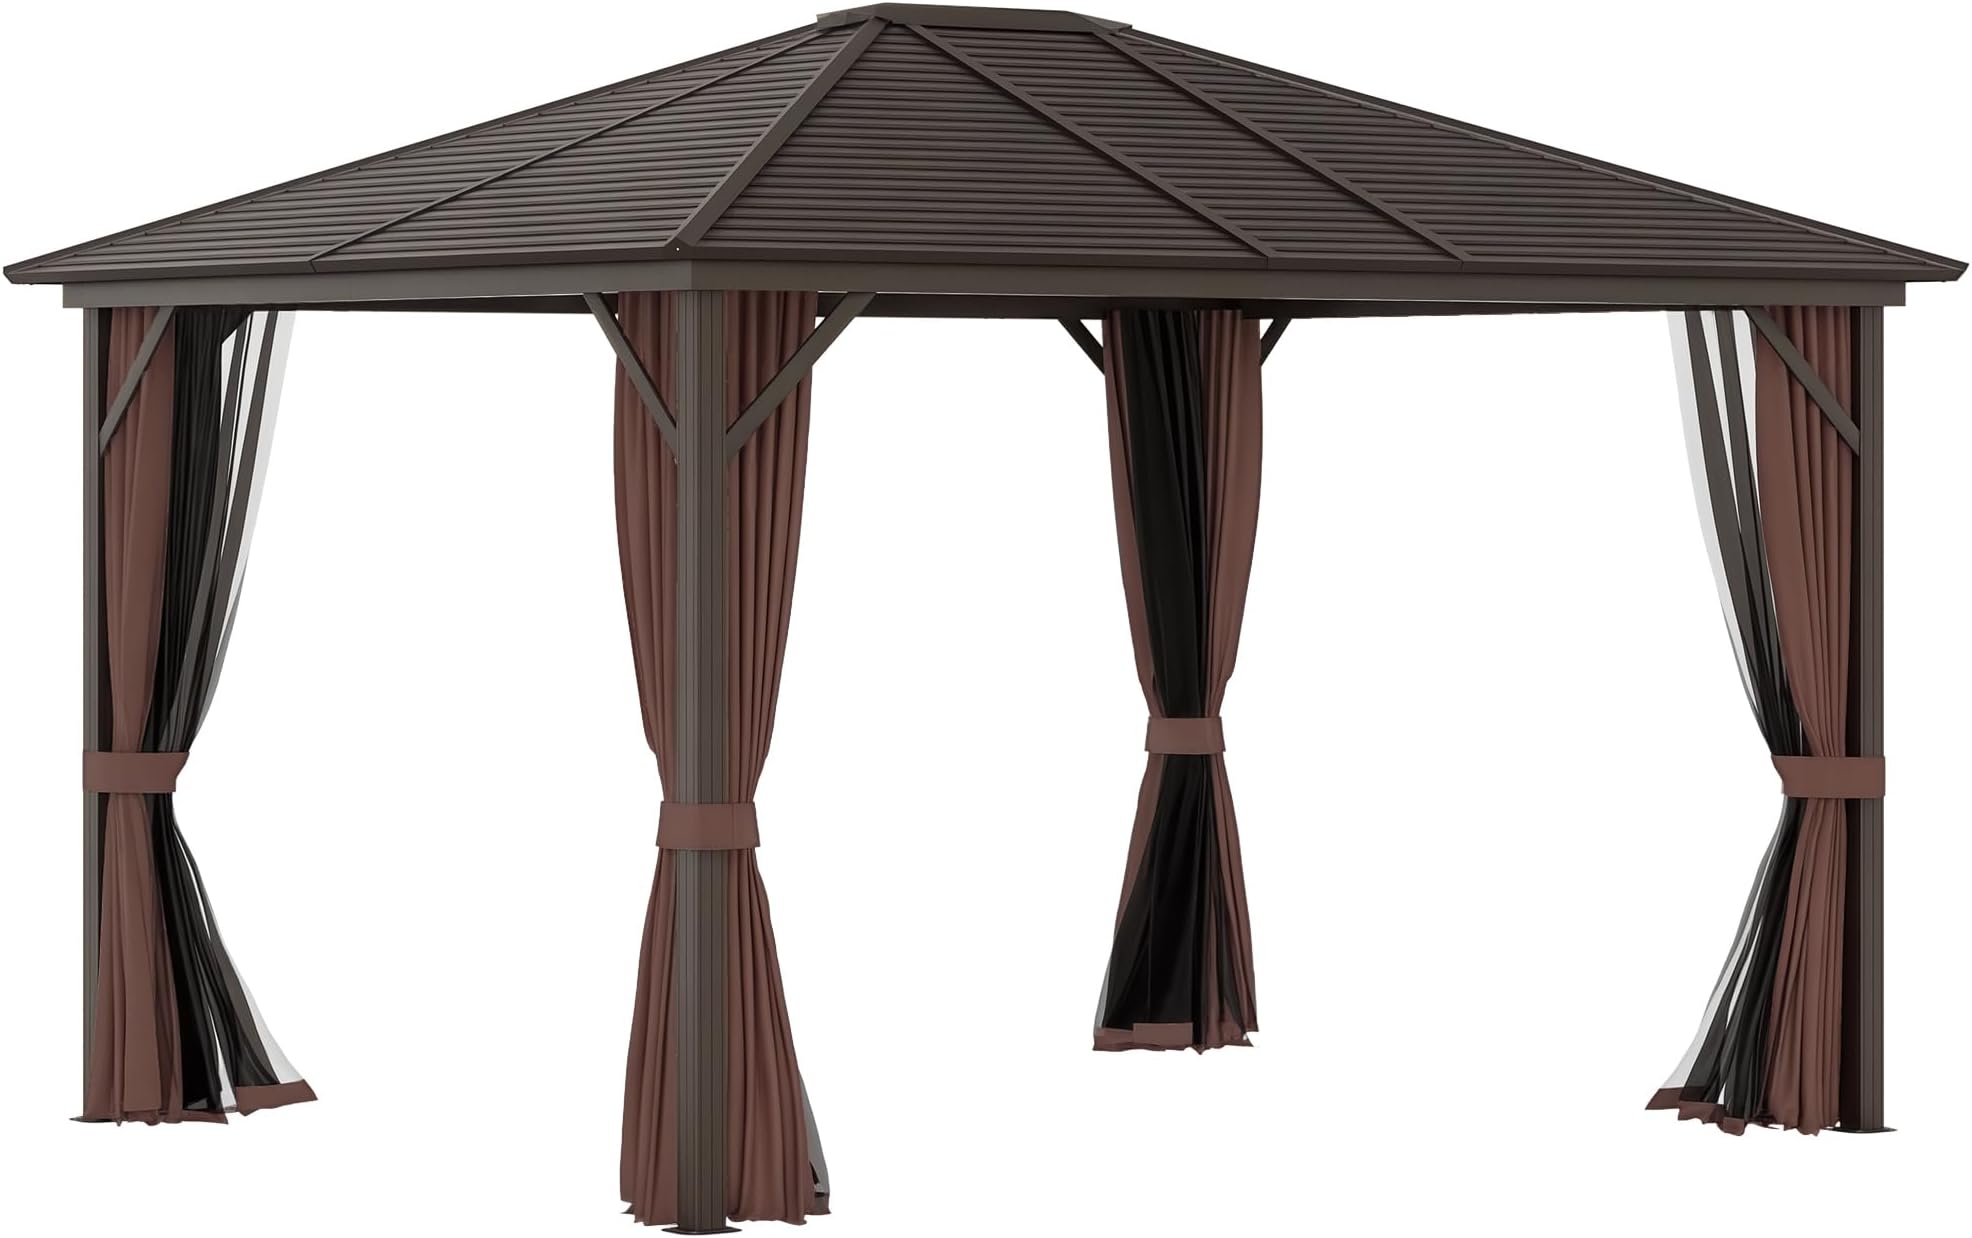
So I don't write reviews that often, but this product needs to be talked about! It is an incredible gazebo. The frame is aluminum and can be bolted into a concrete or wooden patio, or spiked into a lawn (comes with spikes). Ours is on concrete and I will eventually be anchoring it into the concrete. It took my wife and I about 6 hours to put the entire frame together on a Sunday. The roof paneling came the next day. I must say I am really impressed with the tolerances for this thing. It's not NASA tolerances, but they are pretty tight...meaning that all the holes line up nicely and things fit really nicely together. Not a lot of jamming and pulling of pieces and holes that are off center. So that's a good thing. Putting the frame together goes a lot faster if you have a drill and a multi-tip screwdriver. Don't use the included tools or it'll take you days to put it together. This also is definitely a two person job. Don't go it alone. The roof, on the other hand, is where you will test your engineering fortitude. The instructions are pretty good, though not completely clear on the roof build. There was no problem with the frame instructions, but when the roof part came, it was a different story. Each panel has a distinct end that is must be slid into the frame, however this is not described in the instructions, nor is there anything on the panels to indicate which side goes up, down, in, etc. After a few trial and errors, my wife and I were able to figure it out and it went pretty smoothly. Now, on to the hardest part: The small, right triangular pieces that go on top of the gazebo and are supposed to easily snap into place, per the instructions. Yeah...not so much! My wife and I toiled on one for a good 30 minutes before giving up. We went and watched the associated video on how to put it together (it's just ok), but it gave me enough info on how to put the small right angle triangular pieces in. Here's the trick: Lay the long, perpendicular side in first, ensuring the tip of the triangle is snug into its place. THEN, lower the angled side in and work it in from there. The way these pieces go in is different from how the other pieces all went in, and there is nothing to indicate that. The roof took my wife and I about 4 hours with trial and error, so I'd estimate this would take about 6-10 hours to build. The fit and finish is first class, it seems very sturdy. The curtains it comes with are well made, and I'm really impressed with the zippers on both the curtains and the mosquito netting. They seem really robust and tough, and not chintzy at all. Everything seems rain-tight (we'll see after the first rain) and as I'm writing this review, I'm sitting under the gazebo on a 100 degree day in Texas and it feels about 85 under here. Not bad...not bad at all...this is a great gazebo; I'm looking forward to spending a lot of time in it this summer! Now...where to hang my tv..????
M**F
Review of Gazebo.
Shipping: Add a week to whatever delivery date they give you. Our order was processed and a shipping label was created but it was over a week before the cartons showed up at a Fed Ex site to begin transit. The gazebo came in two large heavy cartons, one was 135 lbs. the other was 115 lbs. The large flat carton holds the roof pieces, the long narrow carton holds the frame pieces, the hardware, the manual and the netting and curtains. If you look at the cartons, youโll see that if you cut the tape along the base, you will be able to lift off the top of the cartons. But, donโt go crazy with a utility knife, you donโt want to slash the curtains or netting. Everything was very well packaged. Although the cartons showed some damage on the outside, everything inside was in good condition. Tools: Included with the hardware is a Barbie sized Phillips screwdriver, a stamped 10 mm wrench and a 4mm hex key. I didnโt even bother taking them out of the shrink-wrap. Get a good #2 Phillips, a good 10 mm wrench and a good 4mm hex key. You will be using the hex key a lot, so if you can find one with a ball end and a handle your hands will thanks you by the end of the job. Youโre also going to need a 5 or 6 foot step ladder, there is just no way to assemble this thing without a ladder. Besides the step ladder I also used a short two step kitchen step ladder for some of the assembly that was just above a comfortable working height. I also found a โSpeed Squareโ was handy for checking and squaring up the frame. Installation: The manual is generally good. The steps are well laid out and they show you what parts you need and how many of which sized screws are required for each step. Mostly. I found one step where it said 32 screws were required but they didnโt specify the size. I used a longer screw than what was called for and then realized my mistake and had to back track and swap them out for ones of the correct size. My suggestion is to sit down with a cup of coffee before you start and go through the manual and add up how many of which screws are required per step. It will then become pretty obvious what screws to use when and where. Read the instructions! There are a couple of steps where they tell you to leave screws loose until step number X. They mean it. There are places where there has to be some loose slop in the assembly until other parts are added, then you can tighten everything up. I suppose that if I had to, I could have assembled this by myself however it would have taken much longer. This is definitely a two-person job. There is no easy way to build the frame without having a helper hold up sections so that you can screw them together and there is no way to tighten the screws in the roof panels on without having a body on either side to hold a hex key or wrench. It took my wife and I a little over two days to put the gazebo together. If we were to do it again, Iโm sure we could assembly it in less time. After all of that I would have to say that we are happy with the finished product. Itโs solid, itโs attractive and the roof doesnโt leak.
A**K
Quality-wise, worth every penny.
Update: I just want to point out that the customer service department over at Aosom Direct are phenomenal. Their response time is extremely fast, and the issues I came across were resolved immediately. FYI, if you live in an area that gets frequent wind, you may opt to use more substantial ground-anchoring methods. While the pavilion feels substantial, a 40mph gust of wind caught ours and flipped it over into my neighbors yard against their house. Since our setup is right next to a privacy fence, the wind had nowhere to go but up! Only 2 panels and a leg suffered damage, as the rest of the structure held together without a scratch! A testament to the rigidity of the design. *********************************************** With install complete, it stands as a solid, great looking place to escape to in my back yard. Perfect for what I hoped it would be. Now as for the DIY-friendliness, there are things you need to know: the instructions are fairly straightforward and easy to follow, but when you get to the roof, it gets dicey. The small top triangles do not go in easy. In fact, Iโm a fairly accomplished carpenter, and the only way I could get the top roof pieces installed was to drill and attach the top and bottom panels together with machine screws. The person who wrote the instructions even seemed to be unsure of the best cadence to install the roof panels so I had to take matters into my own hands. There was no way it was going in otherwise. To me, needing to modify a component to get it to work is worth a star less. The only other complaint I had is that some of the holes in diagonal bracing at the post-to-beam connection were misaligned. The frame of the structure was square within 1/4โ tolerance, the posts were plum and level to each other, but still half of the holes didnโt align and I needed to drill them out a bit. The only reason Iโm not giving this 3/5 is because Iโm sitting here in my new oasis, finally content with my weekend.
A**Y
Money well spent.
Nice quality, aluminum frame and galvanized steel roof. Definitely worth the cost seems to be quite sturdy and relatively easy to assemble. This one must have an updated roof design, only 4 panels per section. Assemble left to right as the directions said. Hardest part was keeping the clips on the edge of the roof panels. Those must be for weather deflection. Mostly 1 person assembly with help from another to install the roof sections for about 1hr. Recommend getting some decent Allen sockets and a power screw gun to help speed up the assembly, included tools would have worked but using my own made it much quicker. All in all about 4.5 / 5 hrs to assemble. Will come back to do a post winter review as we get some decent snow and weather in MI.
B**A
Wonderful product - No replacement parts!
All the reviews didn't lie. This was received in record time, shipping box was sturdy and parts wrapped & packaged perfectly. No dented or scratched parts. The gazebo is very well constructed with a long lasting finish. Each piece fit precisely with brass fittings at each screw hole which is above & beyond normal construction. DH was impressed with the construction. Not everything is 100%. The assembly instructions were unclear in a few areas. DH & I did struggle getting some of the roof panels in place. I noticed one other reviewer installed against the house as well. Ours is against the house on our deck. The 10x10 fits exactly on our upper deck. We had to move the frame on the deck to get between the frame & house to install the roofing. The frame held steady & secure while we moved it around the deck. We also had difficulty installing screws into the frame on the house side. A few of those V-clips that hold the 2 roof panels in place got lost in the roof track while installing. The gazebo did not come with any extras for this particular part but the company was most accommodating when I contacted them about the issue. I gave them 5 stars except assembly. I want to thank everyone who posted a review for all your help and hints. I highly recommend this product as well as this company for making an excellent product PS: 3/2026 - 2 yrs later We had a severe ice/snow event 2ft snow. Several roof panels broke away & dented. Called Co for replacement roof panels.They do not provide parts. I would not buy this again.
J**E
Gazebo is not 10โ by 12โ ; it only measures 9โ by 11โ
Customer service - outstanding!! Responsive, approachable, understanding, accommodating Gazebo - fairly easy to assemble if you pay attention to the instructions. You need at least 2 people to get this installed, 3(!) if possible Recommendation - do NOT fasten the base/foundation (as I did to begin with) until roof is installed and secured. You will need the ability to bend and adjust corners to get things to fit Do NOT use drill to fasten screws. It will take longer but using a screwdriver and fastening manually will mitigate the risk of breaking the bolts. They are quite fragile NEGATIVE- I donโt like the fact nor do I think it is fair to us, consumer, that it is advertised the gazebo is 10โ by 12โ but it is NOT! It measures 9โ by 11โ ONLY which is 22sqf less than advertised and, for that reason alone, I give it a 3 stars overall
A**.
All in all a good purchase experience.
I bought this gazebo to replace an old Gazebo that had a fabric top. Because you've arrived and two large very well packed cardboard boxes. The boxes sustained a lot of gashes during their handling while being delivered by FedEx. But amazingly they are so well packed that there was no damage to the parts inside. The gazebo is very well-made. The parts are precision made and fit together extremely well. The assembly requires at least two people but a third makes it much more easier. The only tricky part that I experienced was installing the roof panels. The instruction booklet does not make it clear but the video helps to show proper installation. The gazebo is well priced and I highly recommend it. Also on another note, I was missing two pieces but the customer service was very responsive and expedited the missing pieces within a few days. Very happy with this purchase. On another note, I was missing two pieces but the customer service department was very responsive and replace them within a few days. All in all a good purchase experience.
B**S
Directions are Chinese style IKEA. Small roofing panels are easy if you follow my instructions.
I read previous reviews before purchasing. Overall Iโm happy with this aluminum pergola. Itโs good looking and unlike the rotting wooden pergola I removed from my yard, itโs virtually maintenance free. There are some assembly issues; instructions could benefit from clearer images and better descriptions but with some studying you can understand them. Prior reviews talked about the biggest issue with assembly, which would be the roof panels (not sure why they arrived in a separate box a day after the first box was delivered). There are 16 triangular panels in all, 8 large and 8 small. For an easier roofing panel install you definitely need a second set of hands for the large panels. Partially lay the panel on the roof. Have the helper stand on a ladder and feed the large panel, straight side first, up while you stand on another ladder inside the pergola and help guide the panel from below while your helper slowly pushes it into place. Once you secure it by installing the lower cross piece as your helper holds it in place then you can move on to the next large panel. The 8 smaller triangular roof panels were a bit challenging at first until I figured it out. First I recommend you install the smaller panels as you move along. Do not install all the larger panels first. Itโs a four sided roof, so install two large panels then install the two smaller panels and so on, 2 large then 2 small. Second; as I stated earlier, I installed the larger panels starting with the straight edge first; however, the smaller panel should be started with the angle side first. Push the angle side into itโs roof beam slot and as you push it almost all the way to the top you will find enough flexibility along the straight side that you can just pop it right into place. After struggling with the first two small panels I discovered this method and they went in very easily. Mostly working by myself I put in about 5 hours the first day, 3 hours the second day and two hours the third day. 10 hours total mostly working alone. Two average people working together, cut that time in half
Trustpilot
1 month ago
2 months ago