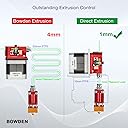
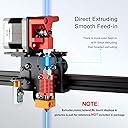
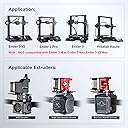

⚡ Upgrade your Ender 3 to pro-level precision—because your prints deserve the best!
The UniTak3D Direct Drive Upgrade Conversion Bracket transforms your Ender 3 V2, Pro, or Voxelab Aquila into a precision powerhouse by replacing the Bowden setup with a direct drive system. Crafted from durable aluminum, it offers stable, balanced operation and supports flexible filaments like TPU. Installation is quick and requires no firmware changes, making it the perfect upgrade for sharper, cleaner 3D prints.


| Brand | UniTak3D |
| Colour | Black |
| Compatible devices | Dual Drive BMG&Dual Gear&Bowden Extruder |
| Item weight | 0.18 Kilograms |
| Material | Aluminium |
| Product dimensions | 6D x 6W x 10H centimetres |
A**R
worth the upgrade
I recently got my hands on the UniTak3D Ender 3 Direct Drive Upgrade Conversion Bracket for my old Ender 3, and I am absolutely thrilled with this product! Let me share with you why this upgrade is a game-changer for any 3D printing enthusiast: - **Enhanced Performance:** This conversion bracket has taken my 3D printing experience to a whole new level. The direct drive setup ensures smoother and more precise prints every time. - **Easy Installation:** Installing this bracket was a breeze. The instructions were clear, and the bracket fit perfectly with my Ender 3 without any hassle. - **Improved Print Quality:** I noticed a significant improvement in print quality after switching to the direct drive setup. The details are crisper, and the overall finish is much cleaner. - **Compatibility:** The bracket is versatile and compatible with Ender 3 Pro as well, making it a great option for various Ender 3 models. - **Durable Build:** The bracket is well-built and sturdy, ensuring long-lasting performance without any compromises. - **Value for Money:** Considering the performance boost and quality of prints I achieved with this upgrade, I can confidently say it offers excellent value for its price. In conclusion, the UniTak3D Ender 3 Direct Drive Upgrade Conversion Bracket has exceeded my expectations in terms of performance, ease of use, and overall print quality. If you're looking to take your 3D printing to the next level, I highly recommend this upgrade. It's a game-changer that will elevate your printing experience to new heights!
M**S
Cheaper than an original x plate
I purchased this as I had damaged the original x gantry when re-installing some components. It was cheaper than an original gantry and is extremely sturdy. It was also extremely easy to fit and includes the advantage of making the extruder direct drive making the machine as a whole more functional.
B**N
Good clone direct drive upgrade.
Decent clone, easy to install, makes a good budget friendly upgrade and can still use your current extruder that fits nicely on top.
S**N
Dial in those retraction settings and you're laughing...
I've been pretty much avoiding going the Direct Drive route because I always felt I had my Bowden + Linear Advance setup pretty much dialled-in. But I'm a tinkerer at heart, and I needed a weekend project. So I grabbed this Direct Drive bracket and went to work. First things first, I parked it on a Voxelab Aquila - an Ender 3 V2 clone. In fact, that's why I chose this bracket: turns out, the pictures shows the bracket installed on a rig with an Aquila shroud. So I knew it would fit. And it did. (FWIW, I'm also rocking a BMG clone - you know the one: all plastic - so I knew my extrusion was already in good hands right at the start of the filament path.) So, 30 minutes after receiving the package I had it installed. I inverted my spool holder so the handle was facing the front - directly above the Direct Drive - and went to work printing THOSE five squares. Now here's where things get interesting. I thought I had my Bowden + Linear Advance dialled-in like a sweetheart. Going Direct Drive proved me wrong. Or, at least, it proved the limits of a Bowden setup. See, straight off the bat I could see I was over-extruding. One wall test later, I dropped my previously perfect 100% flow rate in Cura to 80.40% and saw a huge improvement in print quality - and this was with Linear Advance disabled (M900 K0 in my start gcode). Wow. I always knew my flow rate, when calibrated, should be around 80% but I'd get wall delamination at that rate under a Bowden - but not with Direct Drive. Double wow! Now this makes perfect sense, because there's impossible-to-remove play in a Bowden setup - even with Linear Advance. And that's something Direct Drive can't suffer from. And the difference in quality and dimensional accuracy speaks for itself. Linear Advance was the first "upgrade" I did to my printer (a soldering mod to the motherboard). It was fantastic when dialled-in. Direct Drive beats it. As far as I'm concerned, the age of the Bowden rig is over. Just be sure to dial-in that retraction distance and speed. It makes a whole new world of difference.
T**3
I honestly didn't know what to expect from this kit; I was pleasantly surprised in what I found...
I honestly didn't know what to expect from this kit; I was pleasantly surprised in what I found... The kit comes very well packaged, labelled correctly and has a very easy to follow instruction manual. I would advise you pay close attention to your specific hot-end when disassembling it; there may be additional features such as sensors you may need to orientate correctly. The bracketry is fairly well made and heavy duty for the application (0.105" thick). The hole accuracy is good and the black finish blends well with the machine. I decided against using the supplied Bowden tube as a length of capricorn tube came with my new extruder mechanism. The supplied cable extension is of sufficient quality to work, although I don't like the idea of have more connections in line than necessary. I decided to re-use an older X axis cable I had laying around. The cable ties and re-useable velcro straps are a nice touch and made the installation that much easier. NOTE: The spring adjustment screw on the extruder mechanism cannot be tightened once installed, consider changing the screw for a standard bolt (which is supplied), for access with a spanner. Overall, this is a fantastic value for money mod, that has very few comprimises. Beware that the install may not be as easy as you might think; order of operations is important.
C**N
Looks good to me.
This kit is fairly basic, but should do the job nicely. Not installed it yet, as I'm waiting for liner rail kits to arrive, as I'm going to do several upgrades at once. This bracket looks like it'll bolt together well and should remain locked together.
P**E
Never had any problems with this.
Saw this kit recommended over the official Creality kit because of the centre of balance and light weight. It works well for me, easy to install if you take your time and follow the instructions - which cover using it with different extruders.
B**5
Mixed feelings
Install went perfectly ok, and parts seems to be of good quality. I really don't understand the reviews stating that the spring arm bolt is in the way of the motor mount screw. It's not hard to work out that you put the motor mount screw on to the hole first, then insert the adjustment hex bolt, and wind it right in so you can get the hex key in and tighten up. What I am frustrated about is that the description clearly says that a BL touch bracket is available. Upon asking the seller, I got a message back saying "we don't have a bracket". How did you take a promo picture with one attached then? I'd print one, but can't now unless I take everything back off again.
Trustpilot
5 days ago
4 days ago