


Buy anything from 5,000+ international stores. One checkout price. No surprise fees. Join 2M+ shoppers on Desertcart.
Desertcart purchases this item on your behalf and handles shipping, customs, and support to Iceland.
๐โโ๏ธ Secure your splash zone with style and ease!
The Life Saver Pool Fence DIY Section Kit offers a professional-grade, removable pool safety barrier that meets US CPSC height standards. Each 12-foot pre-assembled mesh section features industrial-strength, UV-resistant Textilene mesh and stainless steel pins for durable, weatherproof protection. Designed for versatile installation on multiple surfaces, this kit empowers homeowners to secure their pools quickly without contractors, backed by a limited lifetime warranty and expert support.


| ASIN | B00BIKTISG |
| Assembly Required | Yes |
| Best Sellers Rank | #19,547 in Patio, Lawn & Garden ( See Top 100 in Patio, Lawn & Garden ) #31 in Pool Safety Products |
| Brand | Life Saver Pool Fence |
| Brand Name | Life Saver Pool Fence |
| Color | Black |
| Customer Reviews | 4.5 out of 5 stars 1,495 Reviews |
| Global Trade Identification Number | 00741360781641 |
| Included Components | Life Saver V110P-5 Diy Pool Fence Section, Pre-Assembled 4' X 12' Section Of Fence, Required Deck Sleeves/Caps, Stainless Steel Or Brass Safety Latch, Template |
| Item Dimensions L x W | 48"L x 144"W |
| Item Type Name | Removable Mesh Safety Fence for Pools |
| Manufacturer | Life Saver Pool Fence Systems, Inc. |
| Manufacturer Part Number | V110P-5 |
| Material | Aluminum |
| Material Type | Aluminum |
| Model Number | V110P-5 |
| Number of Pieces | 12 |
| Product Dimensions | 48"L x 144"W |
| Required Assembly | Yes |
| Style | Section Kit |
| Style Name | Section Kit |
| UPC | 741360781641 |
| Unit Count | 48.0 Square Feet |
M**Y
Easy install
Fence seems to be good quality. I would buy again. If drilling through concrete, get the right drill. A regular hammer drill will not work. You need a SDS hammer drill.
A**K
Great fence!
Five stars. Solid fence. Hardest part is drilling the holes at the right angle, I used a level but it didnt turn out perfect. Fence is great tho.
J**N
Awesome Pool Fence...Make Your Own Drill Guide
This pool fence is awesome and installs quite quickly easily with some planning, following the directions, and using the right tools. I installed 45 feet of this in about 2.5 hours. I did a ton of research and read lots of reviews. As far as their drill guide goes...the general concensus from many reviews is it's overpriced garbage you'll never use again and it may not even give you good results so I decided to make my own for about $10. I purchased at Lowe's a 1/2" x 4.5" iron pipe threaded nipple and a 1/2" iron pipe floor flange. Thread the 2 pieces together and screw down in the center of a piece of wood. I used a scrap piece of some 1" by ? lumber I had laying around that I cut down to approx 4" x 13". I drilled a 3/4" hole of out the center of the wood first. The necessary 5/8 masonry bit fit nice and snug inside the pipe...so much so that the head of the drill bit will not fit through. You must slide the drill bit up through the bottom of the guide before attaching the bit to the drill. I used a Bauer rotary hammer drill I got at Harbor Freight and a Bosch 5/8" x 12" (yes 12" is plenty long enough with my homemade drill guide) SDS Plus masonry bit I picked up at Home Depot and it worked great. As far as the whole light lean, heavy lean issue goes, I simply used a wood shim between my patio and the bottom of the guide. Slide it closer to the drill bit...heavy lean; further away from the bit...light lean. Line up the tip of the bit with the mark you made for the hole, step on each side of the piece of wood to hold the guide in place and drill til you bottom out the drill on the top of the guide. Piece of cake. Hope my review helps you decide to get this fence and save some serious money and get great results by building your own guide like I did.
M**I
Just installed
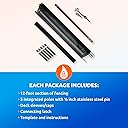
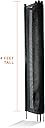
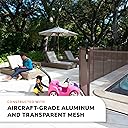
I just installed this fence. I thought it would be easy... turns out that it was unbelievably easy. I didn't get the guide because I'm cheap. I used a bullet level and a 14"drill bit, set up the bit so it was plumb(ish), and drilled away, trying to make it as straight as possible. This worked ok. Some of the pegs are slightly crooked, but not noticeable unless someone is being nitpicky about it. If you don't have someone to help you, and if you are doing a long stretch and doing corners and stuff, save yourself the trouble and get the guide. My area was small, so I only had to drill 10 holes to install 24' of fence. One side butted up to a block wall, the other side butted up to the aluminum framing of the screened pool cage. I was able to use 1" EMT conduit straps with appropriate hardware to secure these ends (sold separately). You can use it without the gate. There are instructions within the installation instructions that tell you how to do this. However, I just went one peg back from the end, drilled a hole, and am able to roll up that section and insert into the hole. You'll understand what I mean if you read through the instructions. A regular HAMMER drill worked fine--but as I said before, I only had to drill 10 holes. I bought a rotary hammer with a drill function specifically for this project, but didn't realize that it needed special SDS bits. Regular masonry bits wouldn't fit into the chuck. You may want to check on this before going out and buying a rotary hammer drill for this project. Unless you have a lot of holes to drill, a hammer drill will work just fine. The instructions weren't great, but if you have any handy skills whatsoever, it's not a difficult install. I'm not completely confident that it will hold up to the elements, but I think that's something time will tell. I did read some comments that said it was "flimsy" or "cheap". If you set it up right and tight, it looks pretty sturdy. The fact that it doesn't have a toprail makes it both easy to store/ship, and difficult to climb. It's not going to keep trespassers off your property, but it oughta keep your kid busy trying to climb it long enough for you to catch him/her.
P**D
there must be a better and less cheesy way to do this
This appears to be a solidly built fence that is quite strong when installed. It is also fairly unobtrusive and attractive around the pool. It is very simple to install and remove. It remains to be seen if the material can hold up to a Phoenix, AZ summer with 120 degree heat and unrelenting sun from May to October. Iโll try to remember to post an update in 1 year. We rented a rotary hammer drill from the "Big Box Storeโ including the 18โ drill bit for $50 for 4 hours. It took about 1 1/2 hours to drill 36 holes. It is quite quick if you plan every step ahead of time, recheck twice, and have some experience using power tools. We didnโt bother with the overpriced metal guide which seemed poorly made and overly fussy to be worth the money. We eye-balled the hole angles using a Carpenterโs Square for 90 degrees and an Sliding T-Bevel to set the lean. Speaking of lean, know one was able to quantify light lean vs heavy lean - Even the seller never returned my email. We used 2-4 degrees off 90 for light lean and 6-8 degrees off 90 for heavy lean. All our poles are standing straight so that must be about right. By the way, This isnโt rocket science. If you are off a degree or two, nobody is going to notice or care (unless you are OCD). We skipped the cheap spring hooks and screws (come on guys, there must be a better and less cheesy way to do this!). We purchased heavy-duty UV protected zip-ties with a 250 pound static load strength which is probably more than the supplied hooks. If you go this route, only use UV- stabilized zip-ties and replace them at least yearly, because they will deteriorate over time. The biggest negative are the sleeves and caps that go into the pool decking. They are not well-made and have sharp square edges rather than tapered edges. I predict that they will be toe-stubbers when the fence is not up.
B**O
Happy with the results
I love the way my pool fence came out. Everything fit into place perfectly and the fence is sturdy and taut. My child will not be able to get through. I have seen some negative reviews about the fence sturdiness or the drill guide being ineffective, but I can only assume these folks didnโt properly follow instructions. The drill guide is an absolute must have for this install. Donโt try to make your own or go freehand. You need to be able to drill holes with the proper light or heavy lean in order for the fence posts to come out correctly. Follow the instructions provided, they are well written and vital. People complained about the drill guide wing nuts coming loose during use, but you can tighten the wing nuts with an Allen wrench, and I had no problems with them coming loose. I had to drill 46 holes and it lasted. You wonโt be able to use the guide for much else afterward, but you need it for this job imo. Get a high powered hammer drill (with extra batteries if going cordless) and good quality drill bits. Youโll need multiple bits if drilling lots of holes (maybe a new bit every 10 holes) into concrete/rebar. I drilled through flagstone/concrete/rebar. Dribble water onto the hole as youโre drilling to avoid stone from splitting. I also chose to skip the gate as you can just open one of the panels and stick it into a layback hole for when the pool is in use, so I canโt speak to the gate quality or ease of installation. Iโm happy with no gate though. Overall, if you can follow instructions and have the strength to drill the holes, then you can do this job and I would recommend this pool fence and drill guide.
F**R
Buy a ROTARY hammer drill...
If you need a pool fence then you should get this one. It isn't nearly as unsightly as I first feared it would be. You definitely need a Rotary Hammer Drill to do this job. If you have more than 5 holes (1 panel). Go to your local harbor freight and pay the extra for the ROTARY one. I couldn't complete this job with just a Dewalt Hammer Drill. It didn't have enough power to go through the 4 inches of concrete you need to bust through. You definitely need the longer (5/8 x 14"+ masonry drill bit) as the other reviewers tell you. No one mentioned the rotary hammer drill though in reviews. So that's of note, since I wasted 3 days trying to get the holes I needed with the regular hammer drill and it took me mere minutes with the rotary hammer drill. And the prices werent far off from each other. The directions are pretty good. If you read them thoroughly. I would consider myself and my husband to be entry level DIYers and it took us 4 days (3 wasted with the regular hammer drill though). If you are confused about the difference between drills, I suggest you google hammer drill vs rotary hammer drill. Videos will show you the difference and how quickly each gets through a concrete slab. Definitely buy the guide Pool Fence DIY by Life Saver Drill Guide . Don't cheap out on that. I know its expensive but it's worth it because there is a need to lean some of the poles where you have a turn around the pool. Light leans or heavy leans depend on the angle of the turn. You need the guide for accuracy. We also bought the gate Pool Fence DIY by Life Saver Self-Closing Gate Kit, Black and that worked well for me. But honestly, you don't even need a gate the sections open pretty easily. If you attached the hook and eye they give you. Although I took the advice of some reviewers and did a black ziptie to attached the sections to each other. If you aren't going to remove it a lot, honestly, it looks less obtrusive. Overall, I just put it in...I'll try to update in a few months or year and let you know how it weathers. We do have a whole section that goes into grass and plan to use the method one other reviewer suggested with the pipes in the ground but for right now its staying up fine with just jamming it into the ground. Although, poolfencediy.com has a method they recommend with concrete and copper pipe too. They are your best resource. Overall, its for the safety of my daughter, and you can't put too big a price on that. I was quoted almost the exact fence for the same distance installed and I was going to pay double the amount to have it installed. I would have too. Except now I know the difference between a regular hammer drill and a rotary hammer drill. And I own both! HA! Don't mind the pictures of the dirty pool, it was not completely opened or cleaned yet when the pictures were taken.
M**R
My 2-year-old scaled this fence
**UPDATE** I contacted Pool Fence DIY directly and they sent me a new section of fence for free to replace the gate. Until my daughter is old enough to behave, I will be cutting a fence section to fit the gate slot and will reinstall the gate in a few years. This review should have gone on the gate segment product page, but if you are buying the gate, you are also buying this fence, so I will let it stand. ORIGINAL REVIEW: I bought this fence in 2019 when my wife and I bought a house with a pool. We weren't looking for a pool, but we decided the house was worth the hassle of the pool. I did some research and found this fence consistently well reviewed and decided to buy it. I installed it in October of 19 and haven't had any issues until today (as others have mentioned, buy the drill guide and borrow a rotary hammer from someone, makes this waaaaaaay easier). That said, my two-year-old defeated this fence. My son is 4 and my daughter is 27 months. My son knows not to go in the pool and hasn't ever tried to defeat the fence (to my knowledge). My kids and I were in the backyard, but I was about 100 feet away picking up some toys when I looked over and saw her with a pool skimmer trying to clean the pool. I sprinted over, unlocked the gate, and got her out. I asked her how she got in and she said "I CLIMB DADDY!!!" So yeah, I am not pleased with this. Up until now, the fence has apparently been giving me a false sense of security. After some experimentation, I got to watch how she did it. She grabbed the post for the gate segment of the fence and scaled it like she was climbing a gutter downspout in a James Bond flick. Yes, my my daughter is pretty agile, and might even be part monkey, but this is a pretty serious flaw. If you have kids that are adventurous, this fence WILL NOT keep them out of the pool. I am not sure what to do now.
B**6
J'adore
J'avais des doutes concernant la qualitรฉ et le fait de savoir si il rรฉsisterait ร nos hivers canadien. Toujours aussi beau et ils sont restรฉ droit mรชme aprรจs 3 ans d'utilisation. Facile d'installation !! Je recommande.
A**R
Good product
While we experienced a two week delay in delivery we were happy to receive the fence. We have an above ground pool with a 8 foot opening. The instructions were very clear and the installation, on a wooden deck, were quite simple. I had to cut the fence since it was too long but that too was easy to do. Hopefully this greatly improves pool safety for all.
P**A
Great fence for a great price.
Happy with the purchase. I installed this myself, wrecked my first hammer drill on the 5th hole, would highly recommend an sds rotary hammer drill to drill the holes. Kids can't get into pool area, would highly recommend this to others. Quality is very good. Shipped really fast.
A**R
Looks better than excepted!
Looks great! Setup wasnโt terrible. Installed in wooden deck, mostly into the joists, a few into blocks I screwed in. I did not buy the drill guide because of the price, but it would have made install easier and more precise. I just guessed at what angle to drill the corners at, which worked out but would be better and easier with the guide. Overall very happy with the product.
L**C
It works!
Pretty easy assembly once I made a template to drill the holes straight. Great weekend project, happy with result! Fence feels really sturdy.
Trustpilot
1 month ago
2 months ago