We remain fully operational. Our teams are working around the clock to ensure your deliveries continue safely.

DOWNLOAD THE APP


Copyright © 2025 Desertcart Holdings Limited
DOWNLOAD THE APP


Buy anything from 5,000+ international stores. One checkout price. No surprise fees. Join 2M+ shoppers on Desertcart.
Desertcart purchases this item on your behalf and handles shipping, customs, and support to Iceland.
❄️ Chill Out and Power Up Your Pi!
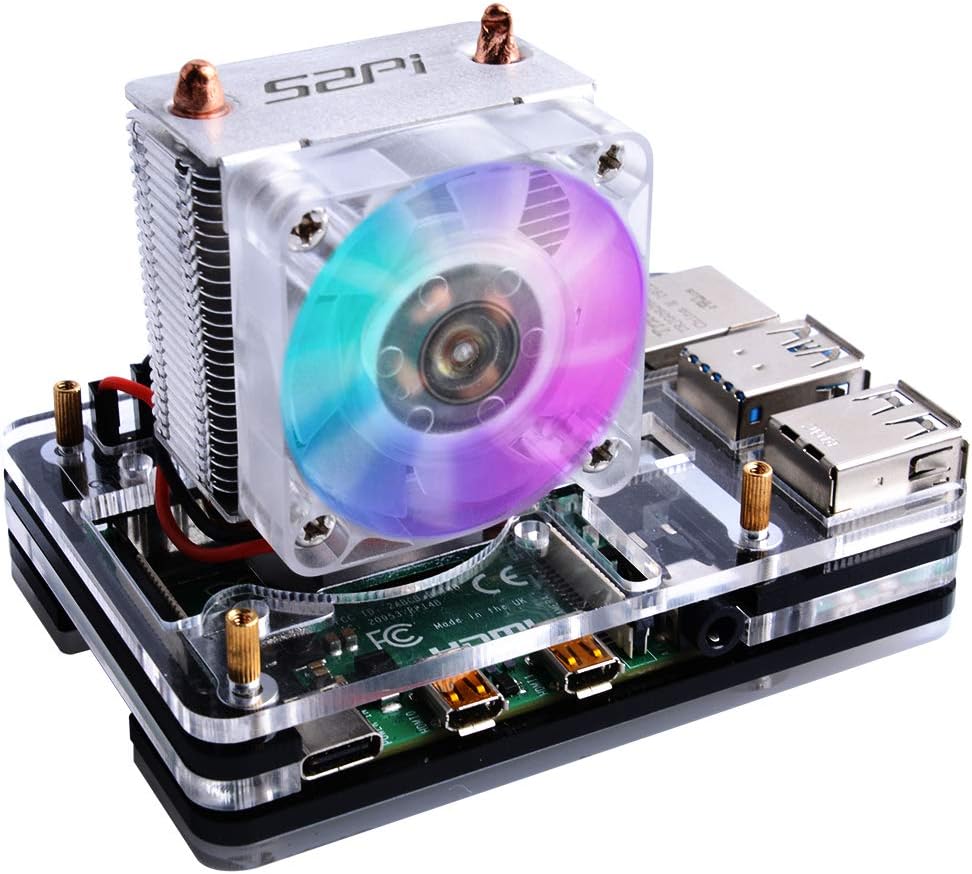
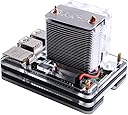
The GeeekPiCase with ICE Tower Cooler is a comprehensive cooling solution designed specifically for the Raspberry Pi 4 Model B. It features an innovative Ice Tower structure, easy installation with all necessary components included, and a stylish fan with LED lighting, ensuring your device runs efficiently while looking great.
| ASIN | B07ZCX5KG6 |
| Best Sellers Rank | #7,445 in Single Board Computers (Computers & Accessories) |
| Brand | GeeekPi |
| Compatible Devices | ['Raspberry Pi 4 Model B'] |
| Cooling Method | Air |
| Date First Available | October 21, 2019 |
| Item Weight | 9.1 ounces |
| Manufacturer | GBBO |
| Material | Acrylic, Alloy Steel, Aluminum |
| Number of Items | 7 |
| Package Dimensions | 4.41 x 4.29 x 3.43 inches |
| Power Connector Type | 4-Pin |
| UPC | 703501203863 703501203917 703501203924 |
| Voltage | 12 Volts (DC) |
| Wattage | 1.5 watts |
H**R
Doubles as a Fruit Fly Shredder
Installed a few of these on Raspberry Pi's in my office and the next day I noticed several stunned fruit flies crawling around nearby trying to fly again. I didn't realize it immediately, but the lighted fan, and the cooling fins on this product combine to make a reasonably good fruit fly shredder (while cooling the Pi too). Add a sheet of sticky fly-paper in the path of the exiting air, and you have something very much like the Katchy product, but silent and small. Other reviewers have either complained about assembly or extra parts, or confirmed that it's just a bundle of two products with some parts overlap, and works fine. I'm in the latter camp. I'll find some other use for the extra stuff, but the case, and the cooler can be assembled such that they fit well. Also, if you don't want the case, there's another listing on Amazon (same GeeekPi brand/seller) for a little less that's *just* the cooler, so buy that instead.
D**N
Great little computer!
I think I'd reflect the sentiment of a couple other reviewers - the instructions are printed with microscopic fonts and not overly helpful, but this isn't very difficult to assemble despite that. Got it together, installed OS on it and set up PiHole for my home network. Even in the extreme heat we had a few weeks ago, with the Ice Tower and fan it never got above 35C, which is fantastic. Love it!!!
C**Z
bad docs, but works perfectly
Works great. As others have commented, instructions are a bit whacky. But you can see how the case goes together and how to assemble the braces for the radiator. Then use the pictures of this item in the description as the way to assemble it. It’s pretty obvious when you stare and compare. On 3v3 rail, the fan is totally silent and cpu temp at idle is 30C and 35C under load. Perfect. Makes a pretty desk ornament, too ;-)
R**Z
The top acrylic layer broke
The cooler by itself is great, no complains. But the reason for 4 star instead of 5 is the acrylic layers that act as the case for your pi. First of all it’s kinda hard to assemble and when your tightening the top 4 screws, they tend to tilt and it eventually lead to one of the corner top layer to break. The cooler is great, overlooked to 2147 MHz. I’m using a software controlled switch to turn the fan on/off so the fan should last me quite a while.. as oppose to staying on 24/7... P.S: To automatically turn fan on/off I’m using a super tiny PCB made by YouTuber Jeremy S Cook..
J**Y
cheap but works great
I was running heat sinks and a single fan in an acrylic case at a steady 65c temp. I installed the ice tower and changed the case and now I'm at a steady 42.5c. I installed the extra fan that came with the case ice tower set with a printed duct and some moding to the case and I'm at a solid 35c temp. the fans both on 5v are not really loud. no issues with sound or performance
D**O
Great cooler for the Raspberry Pi 4
This my favorite cooler and case. It looks slick and it’s sturdy. It keeps the Rpi 4 cool and the color of the fan changes cinstantly so it looks great also. My only gripe is the the case didn’t come with instructions so YouTube is your best friend for figuring that out.
W**L
Out of 28 bucks
The acrylic case is not compatible with the cooler at all who ever said it is is wrong. It leaves a space between the metal brackets and the acrylic. You have to mount the cooler by itself. Had I known this I wouldn't got this cooler. It is essentially two different coolers one tou use a fan and heatsinks and the active cooler tower
A**R
Easy to put together if you follow the video that's in the item description
So after seeing the review on here, and then reading reviews on other sites about the fan assembly itself I was wondering if there was a disconnect somewhere. There isn't, if you look at the item description there is a video showing how to put all of this together. Included in the package are both the ICE Tower Cooler and then a standard cooler for a Raspberry Pi Case. The case is included and will work with both cooling options. All you have to do is follow along with the video to determine how to assemble it. Very simple assembly with the only minor headache of routing the wires for powering the fan, my suggestion is to route over the top of the case. Not as pretty as it could be, but very functional for a rather hot board.
M**.
The Geeekpi ice tower looks beautiful when installed on the Raspberry Pi 4 and it really seems to cool my system down when running stress tests. However, I was disappointed by the quality control of the product. The cooling block itself seemed to be a bit loose. With only a small amount of force, I was able to tilt the cooling block left and right, even when I tightened all screws properly. The reason for this is, is that the cooling block itself is attached (out of the box) with a small piece of aluminium which contains screw holes. Using these screw holes you can attach the cooling block on the Pi. In my case, I found that the cooling block itself loosely connected to this small aluminium block. I do not know how these two parts are connected to eachother in the factory (perhaps glue, or simply wedged together), but I couldn't bother to look into that and fix it myself. I simply returned it right away the same day. Since I think this could possibly a simple product defect and I was out of luck, I decide to give it 4 stars anways and perhaps re-order it later.
G**O
Il Raspberry Pi 4 porta con sé un indubbio aggiornamento di prestazioni rispetto alle versioni precedenti; tuttavia, le maggiori prestazioni hanno un costo, in termini di consumo energetico e di produzione di calore del SoC. Già nell’uso quotidiano il Raspberry Pi può generare una grande quantità di calore (si arriva facilmente ai 60 gradi Celsius). Per molti utenti, un Raspberry Pi 4 funziona perfettamente senza alcun raffreddamento aggiuntivo. Il problema si presenta quando si esegue un carico di lavoro che utilizza la CPU e/o la GPU per più di circa tre minuti e mezzo. Dopo questo periodo di tempo, il SoC ha raggiunto la sua temperatura operativa massima di 80 gradi Celsius: a quel punto si ridurrà automaticamente a 1GHz rispetto agli 1,5GHz di serie. Se il carico di lavoro continua, il SoC continuerà a rimbalzare tra il funzionamento a velocità massima e ridotta fino a quando non avrà la possibilità di raffreddarsi. Per ottenere prestazioni massime sostenute, la temperatura del SoC deve essere mantenuta al di sotto degli 80 gradi Celsius. Tra le diverse soluzioni ideate dalla comunità per il raffreddamento del Raspberry Pi 4, l’Ice Tower progettata da 52Pi è sicuramente la migliore, con la sua ventola colorata, brillante e lampeggiante. Ha una struttura a torre, tubo di rame da 5 mm, dissipatori di calore multistrato e potente ventola a sette pale, rendendo il sistema un super radiatore per il Raspberry Pi. L'Ice Tower 52Pi si ispira ai dissipatori di calore raffreddati a ventola (HSF) in stile torre a stack singolo che dominano il mercato dei PC desktop. Quando viene disimballato dalla scatola, si resta impressionati per la quantità di accessori presenti all’interno: • 2 x barre di fissaggio in acciaio (adatto per Raspberry Pi 3B+/4B); • 1 x ventola LED per l’Ice Tower; • 1 x ventola nera per l’Ice Tower; • 8 x M2.5x6+6 colonne di rame; • 4 x M2.5 dadi; • 6 x M2.5x6 viti; • 3 x pad termici; • 1 x pannello di protezione acrilico trasparente (ricordatevi di togliere la pellicola, altrimenti è opaco); • 1 x mini cacciavite. Questo ciò che troviamo nella confezione propriamente dell’Ice Tower. È presente poi una seconda confezione, che contiene la custodia acrilica a cinque strati, e non finiscono gli accessori: • 1 x ventola a LED blu trasparente; • 1 x cuscinetti antiscivolo; • 4 x viti e dadi per applicare la ventola in posizione orizzontale direttamente sulla custodia; • 4 x viti e dadi per il fissaggio delle parti che compongono la custodia; • 4 x heatsink con pad termico già applicato; • 1 x mini cacciavite. Quindi, nel complesso, acquistando il prodotto si hanno tre diverse soluzioni di raffreddamento: utilizzando l’Ice Tower (con l’alternativa tra ventola con o senza LED); utilizzando la ventola senza il radiatore, installandola orizzontalmente direttamente sulla custodia in acrilico a cinque strati; oppure, utilizzando un raffreddamento passivo, con i quattro heatsink compresi nella confezione. L’installazione del radiatore insieme alla custodia è risultato piuttosto semplice, ed in ogni caso si reperiscono facilmente diversi video che mostrano la fase di assemblaggio. La ventola non si può regolare via software, non essendo dotata di controllo PWM. È possibile scegliere se alimentarla, sulla GPIO, tramite 5V o 3.3V: nel primo caso funzionerà alla massima velocità, e risulterà piuttosto udibile; nel secondo la velocità sarà minore (il LED riesce a funzionare comunque) e sarà più silenziosa. Comunque, è facilmente possibile rendere la ventola controllabile via software già semplicemente con una breadboard e poco altro. Passando alla prova dei fatti, utilizzando il pad termico e con la ventola alimentata dai 5V della GPIO, nel normale utilizzo le temperature si posizionano sempre al di sotto dei 40 gradi Celsius. Ho eseguito un semplice script per portare e mantenere l’utilizzo della CPU al 100 per cento per dieci minuti, controllando le temperature nei cinque minuti precedenti e successivi. Come si può vedere, la temperatura massima raggiunta è stata di 47 gradi Celsius. Leggendo tra altri appassionati, sarebbe possibile ottenere qualche altro grado di raffreddamento utilizzando una pasta termica invece dei pad termici forniti in dotazione. Credo che nel normale utilizzo possano andar bene i pad termici, con la pasta termica da utilizzare nel caso di overclock. Arrivando a conclusione, l’Ice Tower di 52Pi rappresenta la migliore soluzione di raffreddamento per il Raspberry Pi. È strabiliante per le prestazioni di raffreddamento, ed è fuor di dubbio bellezza e stile del grande radiatore e delle variopinte luci LED che si susseguono. È sicuramente un must have.
M**K
Poco ruido, no es silencioso, pero bien. Disipa genial, en uso normal no pasa de 40.
K**N
Having come from the official pi case (which was really noisy). On first impressions this heatsink and fan is amazing.. totally silent and that's with fan plugged in. Haven't stress tested it yet so not sure if it gets any louder. Case is a bit fiddly but that's probably because I didn't check the instructions first.. if the RGB colours aren't your thing it also comes with a normal fan. Haven't tested this so can't be sure If this its silent but I'd imagine it would be. Very happy with the purchase
A**E
This is a great cooler for the pi 4. Like other reviews mention, it takes a minute to put together, but not that long. Its nowhere near as difficult or "impossible" as they make it seem. Using thermal paste instead of the thermal pads, it keeps my overclocked pi running at 31c during idle, 40-41c under load (benched for 1 hour at 100% cpu load), with 27c ambient temperature. One thing to note, if you want to use thermal paste instead of the thermal pads included in the kit, you will need to leave out 1 of the black plates (the one that goes above the board, and below the cooler arms) and use the extra nuts that come with the kit as spacers for that layer instead. This reduces the height of that layer by about 1mm, which is exactly how much clearance you need to remove. Then when you bolt the last clear plate on the top, it will press the cooler down tight onto the CPU. Be careful not to over tighten the screws if you do this, finger tight only, otherwise you risk cracking the top plate because there is enough play to let it flex using this method. One other tip to make the installation easier: take the fan off the cooler. That will let you slide the plates over top of it, rather than fiddling with the cooler arms after getting all the plates together. You can put it back on at the end.
Trustpilot
3 weeks ago
1 week ago