


Buy anything from 5,000+ international stores. One checkout price. No surprise fees. Join 2M+ shoppers on Desertcart.
Desertcart purchases this item on your behalf and handles shipping, customs, and support to Iceland.
🚽 Flush like a pro with Kohler’s precision-engineered valve kit!
The Kohler Part 85406 2" Toilet Flush Valve Kit is a genuine OEM replacement designed for Kohler Wellworth, Highline, and other models. It includes a 2-inch flush valve, red flapper, triangle gasket, bolts, and washers, ensuring a perfect fit and leak-free performance. This kit optimizes flushing efficiency and simplifies installation, making it the smart choice for durable, water-saving toilet maintenance.


| ASIN | B001EK2864 |
| Best Sellers Rank | #27,486 in Tools & Home Improvement ( See Top 100 in Tools & Home Improvement ) #32 in Toilet Flush Valves |
| Brand | Kohler |
| Brand Name | Kohler |
| Connector Type | Barb |
| Customer Reviews | 4.6 out of 5 stars 1,646 Reviews |
| Exterior Finish | Assorted Colors |
| Global Trade Identification Number | 00040688884073 |
| Included Components | KOHLER GENUINE PART 85406 2" Toilet Flush Valve Kit |
| Inlet Connection Size | 2 Inches |
| Inlet Connection Type | Barb |
| Item Dimensions | 11 x 6.5 x 3 inches |
| Item Type Name | KOHLER GENUINE PART 85406 2" Toilet Flush Valve Kit |
| Item Weight | 245 Grams |
| Item dimensions L x W x H | 11 x 6.5 x 3 inches |
| Manufacturer | Kohler |
| Manufacturer Part Number | 85406 |
| Manufacturer Warranty Description | Warranty |
| Material | Brass , Bronze |
| Material Type | Brass, Bronze |
| Model Number | 85406 |
| Number of Pieces | 1 |
| Number of Ports | 2 |
| Outlet Connection Size | 2 Inches |
| Outlet Connection Type | Barb |
| Set Name | Kohler 2" Toilet Flush Valve Kit (4 Piece) |
| Size | Single |
| Smart Home Compatibility | Not Smart Home Compatible |
| Thread Size | 2 inches |
| Thread Type | Standard Pipe Thread |
| UPC | 040688884073 |
| Unit Count | 1.0 Count |
| Valve Type | flush valve |
G**N
Quick easy fix and enjoy the quiet again.
Working from home has its perks... one of them is being able to notice all sounds the house makes when it is relatively quiet. You can hear a toilet running over and over pretty easily. It ends up being super annoying. I did the simple changes first, the flusher and the flapper change.... that didn't do it. So got this for my Kohler toilet, fixed immediately! Perfect fit, quick install (if you're a little handy). So, if you can't figure out why your toilet keeps running, just get this part and enjoy the quiet again. Have a good day.
O**3
Buy this one
Good replacement, worked as expected. Note, if you are going to buy anything individually in this set, just buy this one. You will be going to the store and buying separate parts one after another, and your costs will be way more than just buying this one.
C**E
A Great Improvement Over the Old Style GP85160 Flush Ball Kit
Had water leaking into the bowl. Generally, a replacement or thorough cleaning of the flapper will improve this. In my instance, I turned off the water source, flushed the toilet to drain the tank down to the top of the flush assembly. The flush ball was removed to ensure the water was below the top of the flush ball assembly. I then left for a few hours and on my return the tank was totally empty. This pointed to the need to replace the entire flush ball assembly (or maybe just tighten the three tank bolts). The new kit, GP85406, comes with everything you need to ensure the repair is complete. The redesigned rubber gasket is the biggest improvement. The rubber piece no longer interferes with tightening the large retaining nut and you are able to attain a proper seal (Hand tighten until tight and then turn another quarter turn with proper wrench). I reassembled the tank onto the base, and tightened the three new bolts. The new bolts are superior to the old brass screws that required a large flathead screwdriver to hold the bolts in place while tightening the three nuts. The new bolts have caps that allow you to hold them while torquing the nuts on the underside. Like installing a wheel on a car, slightly tighten each bolt and then move across to the next nut and continue slightly tightening each bolt until the tank is secured. Don't fully tighten down one bolt and move to another as this may lead to a cracked tank or bowl. I use a level to ensure the tank remains level as each bolt is slightly tightened. Reattach the water source and fill the tank. I then turn the water source off and monitor the water level to see if it is holding at the fill level. Keeping an eye on the bowl to see if water is trickling in is also advised. However, water will often continue to seep into the bowl for a short while after the tank is filled. Give it time and then check the bowl for water flowing down the interior of the bowl. If the water level in the tank is decreasing, either the flapper is leaking or the tank is not properly seated on the bowl. This is a simple project and the skill level to complete the project is a one or two. Just take your time tightening the three tank bolts and do not rush this part of the project.
A**T
Would be nice if all three nuts had threads, otherwise, this kit fits our three Kohlers well
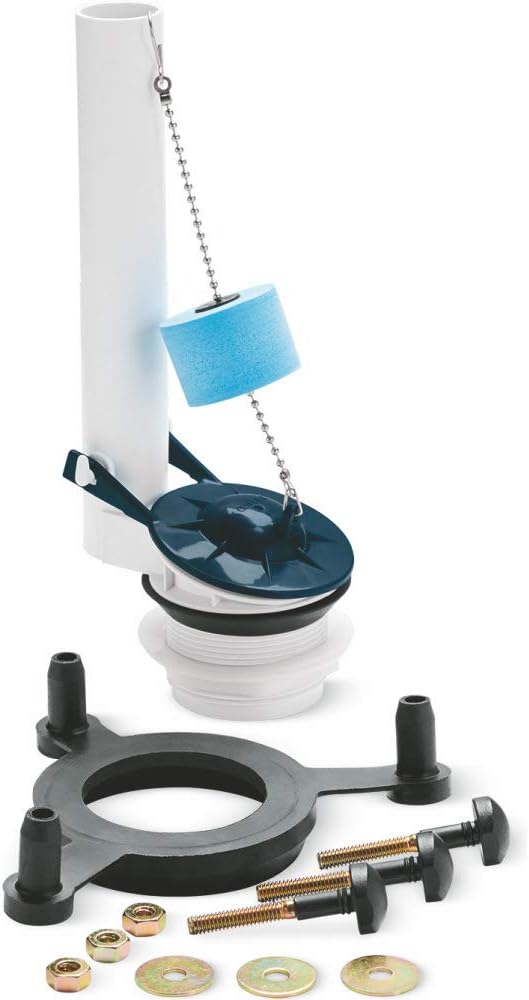
We have three Kohler commodes in our home that are the originals from when our house was built in 1988 and all look great, but for several years, we've been chasing leaking into the bowl from the flappers in all three bathrooms. We've tried different brands, including the Fluidmaster kits, that still started leaking within a year. We decided to see if Kohler had any current kits that would fit our older commodes, that included the three bolt rubber gasket for between the tank and the bowl and I found them here on Amazon. We don't remember ever changing those before because we've never had any issues of water leaking outside the commodes, just at the flapper. We needed three sets, but I ordered an extra one....just in case of any unforeseen problems. Thankfully, I ordered that extra set because the very first kit we opened had a defective nut that had no threads in it. My husband couldn't figure out why the nut wouldn't go on, that's when he looked closely at the nut (photos attached). The only other issue we're scratching our heads at is the spongy blue float, something our previous flush valves have never had. Because the included instructions are quite vague, we haven't quite figured out an optimal position for that float on the chain. When we left it as it was packaged, the float prevented the flapper from closing. When we lowered the float, it stayed under the water and started to pull the flapper up. At this point, we'll probably just remove it.
D**L
Worked as it should
Worked as it should.
B**R
Genuine OEM. It was a bit labor intensive to replace the flush valve
This was a genuine Kohler OEM Flush Valve Kit, part 85406. I also purchased the Kohler Genuine Part Gp1138930 Silent Fill Toilet Fill Valve Kit. I figured let me replace all the working parts since I couldn’t figure out where the problem was coming from. If you only have to replace the fill valve, then you’re in luck because the fill valve is pretty easy to install. But replacing the flush valve is a whole other story and that’s because you have to get to the gasket and that requires you to remove the toilet’s tank. So although the working parts are both quite easy to install, removing the tank makes this diy project, a bit more labor intensive. Luckily, I have a lot of room on both sides of my toilet because I can’t imagine having to do this in a tight space bathroom! Considering you have access to parts of the toilet that you don’t normally get to, I took the opportunity to clean everything up with a vinegar and baking soda solution which was supposed to lighten up the water stain in the tank. I think it did lighten up a bit but it certainly did not remove it completely. Also make sure you have the right tool to remove and install the type of screw bolts used to attach the gasket to the toilet tank because these bolts can easily be stripped and you don’t want to have to do this again nor do I believe that Kohler sells the screw bolts separately, at least not OEM. Also, you may not be able to get the screw bolts off the tank if they become stripped. I think removing and installing the gasket and screw bolts was probably the worst part of this diy project. And be careful not to tighten the screw bolts too tightly because you can easily crack the surrounding ceramic opening on the tank! Seriously, be careful with this part of the job, you don’t want to compromise the integrity of the toilet tank.
M**P
IMPORTANT INSTALLATION NOTE - "LEAKY FLAPPER VALVE"
I deleted an earlier 1 star review for this product regarding a "defective" assembly due to a leaky flapper valve. Basically, an in internal leak with no external spillage, but you can hear a very slow trickle leak. This has the tank do a partial refill every 15 minutes or so and which is obviously unacceptable. Amazon sent a replacement that I received 2 days later. Upon install, it too had a "leaky flapper valve". This made me question my earlier conclusion. I found that hand pressure on the valve did not improve sealing. I also found that when I disconnected it from the hinge pins (so that had no constraints to free, unhindered positioning), it still leaked. As I had previously inspected the sealing surfaces of both the valve and the valve seat, I realized the issue is NOT related to the flapper valve itself! The issue was that the seal that was actually leaking was the seal between the vertical stand tube and the toilet. This seal integrity is controlled by the large plastic nut that the directions say needs to be hand tight + 1/4 turn. In my case, this as NOT sufficient, and the consequences are that the fitting leaks. Key thing is that the leak is INTERNAL, ie, does not leak external on the floor etc. The result is that the tank slowly drains, and hence it does a partial refill every 15 minutes or so. By tightening the large plastic nut with channel locks so it was good and snug (not crazy tight), I completely addressed my trickle leak that was driving me crazy. I SUSPECT others who have been unhappy with "leaky flapper valves" may also have had the same issue
F**R
Excellent kit, but may come with defective flush valve, just be aware and look after you get it.
Who knew it only took $20 and a bit of effort to restore a toilet to like-new condition! This kit was almost exactly what was needed to stop an extremely slow leak into the bowl that caused the tank to re-fill randomly whenever the water level would eventually get low enough. You can easily tell just by looking at the inside of the tank to see how worn out the gasket is (if you can see it worn out, you probably need to replace it). I used this entire kit as-is so all parts would be new. Even the water line isn’t a sticker anymore that eventually just peels off, so that’s great too! I replaced two identical assemblies for each of the tanks and both are working perfectly now! It’s a challenge to remove the old worn parts because you have to drain and remove the water tank too, but the effort was totally worth it, the existing parts were very old and were definitely causing the problem. You won’t have any trouble if your tank is meant for this kit, it will work perfectly, absolutely no leaks now! But the flush valve that comes with this kit was terrible because it didn’t include a tiny pin hole to allow it to fall back down and cover the opening. I had to buy two new flush valves and then return the defective ones. I hope that was just a one off with these kits, because if not, it will be obvious when your toilet double flushes every time. Make sure your flush valve has a small hole in it or it’s definitely not going to work because it will just stay up all the time, no matter how high you adjust the float. It’s a small detail I never even noticed until I bought two new flush valves and could compare the difference side-by-side. With the right flush valve with the hole in it to allow water and air to escape, the float will actually work, I brought the float down closer to the valve because I wanted a stronger flush and no clogs. Hope this helps.
A**R
Easily installed and worked with my kohler toilet
Don't test out the tank bolts into the gasket sleeves before installing to tank. Very difficult to pull bolts out of female sleeve. Works great with testing.
L**A
Refacciones
Ideal para reparar fugas en tanque
J**E
Works as needed
Arrived on time and in good condition. My husband was able to install with no difficulty. Would recommend this product.
P**.
Calidad y fácil instalación
Muy fácil instalación que no requiere conocimiento de plomería ni tampoco requieres herramientas. Kohler sin duda es garantía de calidad. El producto sella perfectamente y elimina toda fuga posible del WC.
T**K
Perfect fit
Easy installation
Trustpilot
2 weeks ago
2 weeks ago