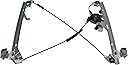
Dorman 741-645 Front Passenger Side Power Window Regulator and Motor Assembly Compatible with Select Cadillac/Chevrolet/GMC Models (OE FIX)
Product ID: 14798123
🔧Easy installation
⚙️Enhanced cable tension springs
🛡️Failure-resistant design
Desertcart purchases this item on your behalf and handles shipping, customs, and support to Iceland.
⚡ Upgrade your ride with power and precision—don’t let a faulty window hold you back!
The Dorman 741-645 Front Passenger Side Power Window Regulator and Motor Assembly is a robust OE FIX replacement designed for select Cadillac, Chevrolet, and GMC models. Featuring enhanced cable tension springs and guides, it resists cable stretching and reel binding, ensuring reliable, long-term operation. Backed by over a century of automotive expertise and easy to install, this part guarantees a precise fit and improved durability over factory originals.




| ABPA Partslink Number | GM1351110 |
| ASIN | B000C11JJ8 |
| Best Sellers Rank | #46,897 in Automotive ( See Top 100 in Automotive ) #6 in Automotive Replacement Power Window Regulators |
| Brand | Dorman |
| Customer Reviews | 4.6 4.6 out of 5 stars (4,233) |
| Date First Available | July 7, 2004 |
| Exterior | Ready To Paint If Needed |
| Hollander Number | 125-1939R |
| Item Weight | 4.5 pounds |
| Item model number | 741-645 |
| Manufacturer | Dorman Products |
| Manufacturer Part Number | 741-645 |
| Model | Dorman 741-645 |
| OEM Part Number | 11A15; 1552-1739R; 20-0107; 21-0206; 52101; 52401; 660197; 741645; 82-179AR; 82122; 82179AR; RPAGM006; RPAGM032; SK741645; WL41645; WLA5001; WPR0510RM; WR0021; WR51001; 15077854; 15095844; 15101786; 15175190; 15755430; 15765392; 15842437; 19120096; 19120847; 19179942; 20914718; 20945139; 25866184; 25885809 |
| Position | Center |
| Product Dimensions | 25.2 x 4 x 15.8 inches |
| Special Features | Easy to Install |
K**J
Easy install
2002 Tahoe it fit perfectly for my vehicle was easy to install, ordering was easy and showed up on my porch in 2 days very happy with Dorman products, they fit well and work with the vehicle specified
J**Y
Good replacement for a factory regulator.
Great fit, took about 30 minutes to install. As other reviews have said, a screwdriver/prybar, 7mm socket, and a 10mm socket are all you need. To remove the door panel, pop off the sideview mirror cover, take out the bezel for the door lock, and remove the bezel for the door handle. All of them are held in with clips, so use the screwdriver to pry them out. Unscrew the bolt behind the door pull/arm rest with your 7mm socket. Lift the door panel straight up and out of the hook slots. Before pulling it away too far, disconnect the little marker light at the bottom, and the switch connectors. To make things easy later on, pull the switch module out of the door panel by releasing the 4 tabs that lock it in on either side, and slide it out. Peel back the vapor barrier on the door, but leave it hanging on the door, because you have to reapply it after. I found it easy enough to remove the door handle at this point so it wasn't in my way. Just pry off the spiral clip holding the rod to it, then undo the 10mm bolt holding it on. Slide the assembly forward, and it comes right off. This may or may not be a necessary step, I don't remember. I just did it instinctively. Tape your window in the up position to the door frame. Loosen the 2 bolts that hold the window to the regulator. Plug the switches back in and roll the "window" down so it releases the clamps from the window. Now disconnect the switches again, disconnect the connector going to the window motor. At this point, it's pretty much as simple as pulling the 5 or 6 bolts that hold the regulator rails in place, and slipping them out. It may take some maneuvering, but there's plenty of room. When putting the new regulator in, make sure you've pulled all the bolts out before hand, and remove the 2 nuts at the bottom. I found it easier to put the motor side in first, then carefully collapse the cable to slip the neutral side in. Line the studs up with the holes in the door at the bottom of the rails, and put the nuts on (loosely). Now you should be able to pivot the top into place to install the new bolts. If I recall, I think I needed to use 1 of my old bolts (near the motor support) but for the other holes, I used the new ones. Tighten everything up, and plug in the motor. Now connect the door switches again, and run the motor up so that the clamps seat against the window. It's a good idea to reach in and push them up snug against the window when tightening the bolts here. Make sure that rubber pad is in place when you do it. Also, make sure the rubber pad from the previous regulator is removed. One of mine was stuck to the window when I pulled the old regulator out. Assembly is reverse of disassembly. Don't forget to reconnect the rod for the door handle. I have years of automotive experience, but this is my first window regulator replacement. Total time, 30 minutes. Tools were a 10mm socket nut driver, 7mm socket nut driver, and a standard flat head screwdriver. These rails are greased, so keep some shop rags or paper towels handy when you do all this. Performance: Rolled my window up and down for the first time in 9 years. :D Motor didn't seem like it was struggling, and it moves faster than my factory drivers side motor. Needless to say, that one is probably near the end of its lifespan too. I'd be more than happy to replace it with this product. For people tackling this for the first time, or people with less experience. It may look intimidating at first, but take your time, and you'll be fine. There's nothing that can go back in the wrong place (all connectors are keyed). I would say for the less experienced, this should take less than an hour. I wrote this from memory, so if I missed anything, I apologize.
S**S
Right Part for the Job... Straightforward DIY...
This was the exact part I needed to fix my '02 Suburban drivers window. Mine just got stuck in place one day. Upon tearing into it, it appears one of the old regulator cables had begun to fray at some point, and then got worse until it got all jammed/bound-up in the pulley/sheathing mechanism at the bottom. As others have said, this is a direct fit and rather easy to install. Mine also included the sheet noting that the Dorman version would be missing one bracket compared to the OE one, but doesn't seem to make any difference. There are a couple little differences between this and the OE one (studs and nuts at the bottom vs bolts), but I think it's all for the better. I did have to use one of my OE bolts for attachment point nearest the motor, but all other points came with new hardware (nuts/bolts) out of the box. Just a note if your window is stuck down or in the middle- All the instructions and videos start with "put the window all the way up" which I could not do because it was frozen/jammed in place. You then must first manually raise your window all the way up by loosening the two 10mm bolts clamping the window and carefully sliding it up by hand (then tape it). That said, depending on where your window is stuck, it could be difficult to access one (or both) of the bolts clamping the window. I found a small 10mm open-end/box wrench (or better yet, a ratcheting box wrench) could be slid up or down the inside of the door onto the bolt and loosened. The door is clearly designed to allow you to loosen/tighten the clamp bolts with the window all the way up, but it's possible, albeit a little tricky, to loosen it if stuck in the middle. I have several other Dorman products on my 'burban already and am again pleased with this and Amazon. I'm sure I'll get the passengers version when that side stops working in the future. As others have said, with a few tools this is a pretty quick job. Watch some videos to get the best idea first, but this DIY is totally worth it over bringing it in somewhere.
P**S
Fit and operates perfectly
Simple to install exact fit window regulator. Replacement was easy on my 2002 Chevrolet Silverado.
@**O
Good quality for the $, 1 Lil issue....
All three holes on the right side were misaligned with the holes in the door. Only slightly, not enough to require a drill, but, did need to use a small round metal file to slightly widen the holes to allow for fastening. But, as the title said, for the money, the quality was quite good. Also, for any first timers, it did come with an instruction sheet, and new bolts, both are usually not included in my previous experiences.
T**R
Make sure the motor is locked in and do not over tighten the motor bolt
Works great really fast I put it on my 2001 gmc yukon
T**A
Replacement was easy and fit well
I ordered the regulator to replace the one in my 2001 Chevy Silverado passengers door. The part arrived just as promised by Amazon. Opening the box I found the regulator, a piece of paper with information type on it describing the possible changes from the OEM part. A small plastic bag with two nuts and a bolt in it. I removed the door panel. Taped the window and removed all the bolts. Removed the old regulator. Just as I figured the control cable had rusted and broken. I compared the new one to the OEM. On the bottom of the regulator where there was two bolts, there are welded studs on the new one.. Also, a support bracket mid way on the right side of the part is not present on the new one. It installed with ease. Studs lined up, all bolts lined up with no problems. Window clamps appeared to be the same as the OEM and tightened to the glass. Powered up and a few test runs all appeared to be fine. Time will tell. The paper work explained the difference of the OEM and the replacement with pictures, its a copy, but readable. I hope the missing support on the right side of the frame does not cause any problem later but time will tell. The paper work shows a picture and explains the missing point of contact. If you want to review the removal/installation of the door regulator, there's lots of videos online to show you the proper way to repair your regulator. The up/down speed appeared normal and non-labored This is an easy repair for the mechanically challenged. It took about an hour or so. Most of that was taking my time and removing the door panel, plastic and wire's and reinstalling them. Take your time and all will work out for this product. The part was priced anywhere from $40.00 to $60.00 dollars cheaper then I found at Auto Zone or Advanced Auto. These are the two parts places around me. I'll update if any problem with it, but so far so good...I HOPE to get years out of it.
A**Y
Exact OEM fit
I thought fixing this was going to make me fill up the swear jar, but nope!! Arrived on time and packaging was in storeroom perfect shape. Everything included to do the install, even had removal and installation instructions. Part went right in and lined up with all the bolt holes with no modifications. I loosened the window carrier bolts before I installed it to save a step. Tested it, raised it to seat the window, tightened the window carrier bolts and it was done. Put everything back together and everything worked perfectly. Thanks Dorman products for your excellen product quality control!!
ل**5
غير مطابق للمواصفات
للاصلاح
J**N
Perfect
Easy install, works as it should.
D**L
Works
Seems to work well, but long term durability remains to be seen. Was a direct replacement for my 2001 GMC Sierra 1500. Came with it's own mounting hardware for the rails which is nice. Only had to use one of the old bolts for the motor. The design of this is slightly different than the OEM one, but that doesn't affect mounting. It comes with a nice slip of paper that describes the differences. Pro Tip: after installing (but before putting your door panel back on), lube up the rails with a generous amount of silicone grease. Not only will this make the power window much quieter, it will improve life of parts. The rails come pre-greased, but a lot of it comes off from handling during installation. EDIT: 5 months later, still working flawlessly. Moves the window noticeably faster and sounds quieter than the passenger side window (which is still OEM). Very happy with this part.
C**D
Seems good so far
It seems to be working good but time will tell just like anything else that's electrical and has a motor. Install was easy the hardest part is pulling off everything from the door panel and under the panel. I'd say difficulty level would be a 3/5. It's best to watch some YouTube videos first before attempting and tape your window up very well especially if your doing this alone. It takes about an hour and a half from start to finish. I suggest when pulling the plastic off the door and reinstalling use duck tape to adhere the plastic to the door and seal it that way all the way around saves time and easier to find than the specialty adhesive glue. The edges along the track are very sharp you may want to wear gloves when installing this. Another thing the track comes greased already but I added grease as it was kinda going slow up and down once I added extra dielectric grease on the edges of the track it went up and down much faster. I installed this on a 2005 GMC Sierra 1500 extended cab and it fits great. I hope this helps
L**R
Window Works!!!
I should start off by saying that I am by no means a mechanical genius. However, once the inner trim and door panel was removed I was able to easily remove the regulator that had failed. Now comes the surprise: I was able to place the new regulator in position and secure it in about 5 minutes. I then tightened the bolts holding the window in place easily. I should note that there is a torque listed for those bolts but my torque wrench does not go that low so I estimated the pressure I applied. Window in place and wires connected a quick check to ensure everything was working properly. Now replace the panel and inner trim. Job done in about 30 minutes. Less cost and more satisfaction than paying to have it done. If the need arises I would not hesitate to purchase one of these for another of my vehicles.
Trustpilot
1 week ago
1 month ago