๐ Elevate your adventureโcarry more, worry less!
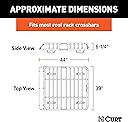
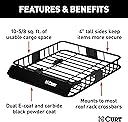
The CURT 18115 Universal Roof Rack is a robust, black steel rooftop cargo carrier measuring 42 x 37 inches, designed to universally fit most vehicle roof racks with easy snap mounting. Featuring 4-inch high walls and a protective windshield, it secures cargo against wind and movement. Its tubular steel construction with corrosion-resistant coating ensures durability for all your travels. Expandable from 11 to nearly 17 square feet with an optional extension, it maximizes storage while freeing up interior space.


| ASIN | B004O844DS |
| Automotive Fit Type | Universal Fit |
| Best Sellers Rank | #1,970,228 in Automotive ( See Top 100 in Automotive ) #2,884 in Cargo Racks |
| Brand | CURT |
| Brand Name | CURT |
| Color | Black |
| Compatible with Vehicle Type | Car |
| Customer Reviews | 4.4 out of 5 stars 2,169 Reviews |
| Global Trade Identification Number | 00612314181155 |
| Included Components | Roof Cargo Carrier |
| Item Dimensions | 41.5 x 37 x 4 inches |
| Item Type Name | Rooftop Cargo Carrier |
| Item Weight | 29.1 pounds |
| Item dimensions L x W x H | 41.5 x 37 x 4 inches |
| Load Capacity | 17 kg |
| Manufacturer | Curt Manufacturing |
| Manufacturer Part Number | 18115 |
| Manufacturer Warranty Description | One Year Limited |
| Material | Steel |
| Material Type | Steel |
| Model Number | 18115 |
| Mounting Type | Easy Snap |
| Number of Items | 1 |
| OEM Equivalent Part Number | 18115 |
| UPC | 612314181155 |
| Unit Count | 1 Count |
| Vehicle Service Type | Car |
J**K
Perfect Roof Rack and Cargo Carrier for Mazda 3
For this year's summer fun I wanted to go further in our adventures with my little 2013 Mazda 3. Did a lot of research on compatibility, price comparison, and other reviews. Then went for the ROLA Roof Rack with the Curt Cargo Carrier. A perfect combination! The ROLA Roof Rack - There are many choices for universal roof racks that are appealing and affordable. BUT they will either damage the paint at the point of contact OR damage the weather stripping at the door. Sure, you could save a couple hundred if your fine seeing 4 scuff marks or worse on your roof everyday or if you don't mind raindrops tapping your shoulder and pooling on your leather seats. Luckily the Mazda engineers had the foresight to include anchor points on this model. There were only a few roof racks to choose from that are compatible with my Mazda 3 and they were double or triple the cost of the universal racks. I decided on the "ROLA 59833 Removable Anchor Point Xtreme AP-GTX Series Roof Rack for Mazda 3 Hatchback". The reviews were great and I didn't have to pay extra to thule around town and yakima'bout having a label. Easy to install (about 20 min). The black compliments the trim. And now my sporty little Mazda 3 is adventurous like those pristine Subarus that only see dirt when taking their labradoodle to the dog park. The Curt Cargo Carrier - This one was much more difficult to select. Do I go with an open basket or a closed bag or a hard shell? Then there was the issue of spacing (between bars and connection points) and orientation (having front/back instead of along the sides). And of course spending more on the roof rack meant I had less for a carrier. I opted for the "CURT 18115 Roof Rack Rooftop Cargo Carrier 41-1/2" x 37" x 4" Mounted". An excellent decision as I wasn't limited to what a case can carry and didn't need to worry about a ripped soft case or broken zipper. Plus this cargo carrier is adjustable in it can fit on a wide range of roof racks and can be expanded with an extra accessory. Easy to setup by myself in minutes. Sturdy construction. And just looks cool. The protruding thread from the connection points aren't a problem if you can load items between them like camping chairs, sleep pads, etc. The distance between the connection points and the bars on my Mazda 3 is offset by maybe half an inch but it's ok with this cargo carrier. The carrier has these wide "feet" that can attach to any set of bars on the basket to accommodate different roof rack separations. And because the feet are wide there's some leeway if you need a little more or less distance. Get a cargo net and extra bungee cords and you're good to go. So give your beloved Mazda 3 a new personality and go exploring!
W**1
Great value, strong build quality, highly recommend.
Bought with the extension (18117) to fit atop my gen4 Toyota 4Runner. It fits very well and looks natural on the vehicle. It is a little long as it hangs about 1/2 way into the sunroof, but does not restrict operation in any way. While assembly was pretty straightforward, I recommend ignoring that they want you to take the plugs from the bar ends before assembly. They are a soft rubber and after adding some black silicone to all the fittings and screw holes gave a nice secure fit and didn't cause any misalignment of the screw holes. I don't expect there to be any problems with rust either considering that I sealed all the possible holes that could leak or have water penetrate. A couple things to be aware the bolts holding the faceplate on are pretty soft I recommend using the provided Allen wrench to tighten them not a cordless impact driver like I did. This caused the screws to strip out at the head but I will likely replace them with stainless if I can find them. There is no additional road noise that I've noticed in my case. The u-bolts provided to clamp it to cross bars are excessively long but a Drexel and some cap nuts will correct that issue and get them below the load line so as to not damage any cargo. So far I really like it, i like the look and utility of it and it appears that it will serve me well.
A**A
Great value for the money!
In a few words: A great value for the money. I own an Isuzu VehiCROSS, and I wanted a roof basket that wouldn't look out of place on it. Most baskets are too boxy or angular; I wanted something with some curve to it. I also wanted good quality. The Curt 18115 roof basket fit all of those needs. While inexpensive and light weight, once put together it is very solid. After I installed it, I could grab it and rock the whole car and it didn't budge an inch. I feel that it could easily carry whatever you put on it for your adventures. Assembly was very easy, a few screws torqued down with a small allen wrench (which Curt helpfully supplies) was all that was needed, and it was ready to go on the roof. It was easy to install by myself, but some people may want to have a helper around (especially if you have a lifted vehicle). Once in place, it was just a matter of locating the plastic supports and u-bolts in the right spots, centering it up, and torquing down the supplied knobs. At that point, it was done. The hardest part was getting the thing centered! Are there any negatives? A few. All of them are minor, and can be easily and cheaply fixed with a little effort. First, when installing the front wind fairing, take care with the plastic brackets that hold it on to the basket. I put my basket together on a cold day, and when I was tightening up the screws for the brackets, the bracket cracked. Fortunately, Curt Mfg. sent me replacement parts when I emailed them, but if you have the option, put it together on a warm day, or put the brackets into some hot water for 5-10 minutes to make them a bit more flexible. I did that with the replacement, and it worked great. The u-bolts have a fine-pitched thread; tightening the knobs down to get the basket solid on the bars took a great deal of time and effort. After the bolts were snugged down, you may also be left with an inch or more of the bolt ends remaining, which can snag on things you put inside the basket. If this is the case for you, keep reading! Lastly: Rust. Since the rack is steel, and uses steel bolts and nuts, water can get into the seams of the tubes that slide together and quickly forms rust. Mine rusted fairly quickly after a heavy rain; a bit of water got inside the tubes, and led to rust, because the inside of the tubes aren't powder coated. So in lieu of these issues, I decided to take matters into my own hands. This is also why I gave the product fewer than 5 stars. Fortunately, in the Amazon reviews for the Curt 18117 extension, another user gives a good set of tips on what parts to buy and how to prep things, which I'll reproduce here. These notes are slightly different. You don't have to follow them exactly (with the exception of the nut and bolt sizes); if you want to mod things another way, go for it! 1. First, off any existing rust with a rag or other means, before it becomes a real problem. After cleaning, use some grease or spray oil/penetrant. Apply it to the problem surfaces of the tubes, such as where the tubes slide together, and on the insides of the tubes. I sprayed a generous amount of Liquid Wrench silicone spray inside mine. 2. Fit the tubes together, then use a dollop of black silicone sealant at each joint; smear it around and work it into the seam. Then put another dab on each screw hole on the top and bottom tubes. 3. Replace all fasteners with stainless steel screws and nuts: 15 pcs - M6-1.0 Stainless Steel Nylock Nut - Fastenal #1L2550000A40000 ($0.43 ea) 8 pcs - M6-1.0 Stainless Steel Acorn Nut - Fastenal #11508471 ($0.27 ea) 5 pcs - M6-1.0 x 16mm Stainless Steel SHCS - Fastenal #MS2550016A40000 ($0.48 ea) 3 pcs - M6-1.0 x 40mm Stainless Steel SHCS - Fastenal #MS2550040A40000 ($0.84 ea) 3 pcs - M6-1.0 x 25mm Stainless Steel SHCS - Fastenal #MS2550025A40000 ($0.64 ea) As you can see, these parts will only cost a few extra dollars. They are worth the peace of mind. Note that you will need a different size allen wrench, as the one supplied by Curt will be too small for these screws. 4. Once you have the screws in place, take a break and let it dry for 24 hours. 5. Once the sealant has cured, use more sealant on any other spots which may collect water and rust; you basically want to seal up every hole you can on the rack using the sealant. Let the sealant dry for another 24 hours. 6. After this last round of sealant, you may then want to give the rack another protective coat; use whatever you think is best for your application and aesthetic desires. For myself, I am planning on using black PlastiDip. I purchased 3 cans of the stuff, plus a spray handle. I should be able to apply 2 or 3 coats. After you have the rack completed, you can mount it on your vehicle. I also intend to put pieces of rubber hose over the u-bolts, to give the roof bars a bit of additional protection. Also, I am going to replace the knobs with additional nylock nuts. If you do this, use an extended length 10mm socket to drive the nuts on. The extra length of the socket will allow for the extra bit of the u-bolt to pass (if that is an issue for you like it was for me). Afterwards, you can take a rotary tool and cut off the end of the bolt, leaving about 1/4 to 5/16 of an inch exposed. Then put one of the M6 acorn nuts over the end (you can add a touch of low or medium-strength thread-locker compound to the bolt as well). That should complete the install, and there shouldn't be any further issues with rust. Note that if you intend to add the basket extension (Curt #18117), you will need four additional 16mm screws. I really suggest getting the extension if you have the room for it. You will need about 30 inches between your roof rails for it, otherwise it won't be very stable on your roof. Hopefully my pictures illustrate what I discussed above. I intend to update this review as I complete the project.
M**N
Nice Rack and Extension for Chevy Tahoe
Awesome Rack, feels sturdy, should last no problem. I read the reviews before ordering, so I knew I needed to do a little work to this rack to make it rust resistant (Thanks to all who reviewed and made suggestions. I am very happy with how it looks on my 2005 Chevy Tahoe. Mine came on time (Awesome Amazon as always). Mine was not all scratched up. All the holes lined up without issue. my welds all looked good although they do not weld around fully around the pipes as it is probably not needed and keeps costs down. This didn't bother me as long as it holds up and I think it will be fine. I would recommend this to anyone willing to spend a little time/money making it rust resistant. I painted the Rack W/Extension with two coats of Rust-Oleum Flat black (3 cans $15) prior to assembly. I replaces all bolds, nuts. I purchased stainless steel bolts, Nylon nuts, and acorn nuts. (Bolts were M6-1.00 x 15mm, M6-1.00 x 25mm, M6-1.00 x 40mm, the Nylon Nuts/acorn nuts for both the bolts and u-bolts were M6-1.00 ($34 in stainless). I put it all together minus the wind screen. I then used black Silicone ($4.99) and filled in all the areas where water could get in/out (about 1 hour). Next I put the wind screen on and proceeded to mount it. I then proceed to mount the rack on the vehicle (used 10mm deep socket as other reviewer suggested). I intend to leave it in place, so I used the Stainless nylon lock nuts in place of the knob nuts on the U-bolts. I used my Dremel tool with cutoff disc and shortened the U-bolts above the nylon nut yet under the rack level and then caped the tops with stainless acorn nuts. I did the cutoff right on the vehicle to save having to take it off and put it back on. If installing on a Chevy Tahoe the fit is really tight, I had to move mounts in towards the center more to get it to fit in. The U-bolts do rub on the top of the vehicle and will probably rub through the paint in time (I'm ok with this). Over all the rack looks great is sturdy. I will test it tomorrow on our vacation and update after a month or so to see if it starts rusting or coming loose.
A**R
We're very pleased with our Roof Rack Carrier
We bought this roof rack (with the extension) for our 2017 Honda Pilot (along with the Cargo bag that Curt makes to fit perfectly inside). It was easy to install, although I will admit the brackets that connect to our roof cross bars did not sit perfectly on the bars (see photo). But it still worked great and didn't budge once we had it screwed in place. The screws are very long and we were worried they might dig into the carrier bag we bought separately and cause it to rip, so we bought little plastic caps to cover the screws (or you could cut them shorter with the right tool). The rack was not too heavy, so the two of us were able to lift onto the roof and install it. We drove 800 miles with this rack and cargo bag on our roof, through a small rainstorm, and pretty heavy wind, and it never moved and everything stayed dry. Having this rack on the roof did create some wind noise, but it was very slight. We are super happy with this product. We originally bought one of the hard plastic pods for the roof, but returned it and bought the rack and carrier bag instead. We're really glad we did. This worked out much better for us. We didn't have the bulky pod on the roof once we arrived at our destination, and it'll be much easier to store when we're not using it. By the way, buying it through Amazon.com was cheaper than buying it directly from the manufacturer (Curt).
A**Y
Great product, and read the other reviews carefully before constructing!
I read the reviews very closely for this cargo rack before purchasing it. It took me about three weeks to take the plunge and order it. I did what others said they did with regard to spraying the screws with silicone, and I used Rustoleum on the bottom of the cargo rack to keep from rusting on my van. I do plan to take this off after returning from our trip. We installed this onto our 2014 Honda Odyssey. We installed Honda crossbars and rails back in March from Amazon, b/c this does not come standard with a Honda Odyssey. We didn't realize that the bars didn't move, so the first car top carrier that we purchased in March did not work on our van....which we found out into our trip. The biggest issue I have with this cargo rack is how long it took to screw in the u bars. Someone suggested using 6 x 100 mm nuts instead of what was provided, but I only did this on one of the u bars. The screwing in the u bar takes absolutely way too long....your hands will hurt after doing this. It is good to use the 6 x 100 mm screws with a ratchet instead of the screws provided, because it is much easier and time efficient. I also put the nylon nuts on the top of the u bars to keep from ripping open my items on the carrier...this worked well....the u bar screws are way too long. Also, the instructions provided with this rack were ridiculous. I had to ask my neighbor's contractor if he would come and help me make sense of how the u bar, plastic, and metal piece were supposed to go together. The fact that he struggled to figure it out made me feel good. IT IS IMPERATIVE THAT YOU UNDERSTAND that the way you snap the plastic piece onto this is under the cargo rack not on top of it. the u bar is on the bottom under the rack with the plastic piece on top of that, and then the metal joint on top. It is very confusing. We drove with this cargo rack and the carrier we bought in May across the country, and it worked perfectly.
G**A
Faulty Parts / very vague assembly
Whoever said this product can be installed in 10 mins oughta be a installation connoisseur because putting it together was not that simple. It was not THAT hard either, but the directions are very vague and there are is only 1 video on YouTube, but is out dated. I found that the clips for the wind protector were to be reversed. The YouTube video states the larger clips go on the top bar and the smaller clips on the bottom bar, but I found that nearly impossible to assemble the visor that way so I switched the large clips to the bottom and smaller clips to the top and it seems to hold together just fine! The screws are definitely either too long or too small. Removing the hardware or the nut once installed is almost impossible. Also, the side guard rails that attach with 2 screws (one inserted through top and one inserted though bottom) mine was stripped! The guard rail itself was fine and the screws were, but the actual rack that the screws insert into in order to attach the guar rail was stripped and would not tighten. The bottom worked and the other side guard rail were fine, but the top screw for the left hand side of the rack would not accept the screw. (The female ems was stripped within the rack) so now I am going to try a larger screw and hopefully it works. Also, the guard that attaches to the back of the rack with just one screw was missing a nut and it needs one in order to lock it. Overall, I have not attached this rack to my Mazda CX-5 yet due to hardware issues. I am in limbo on returning or trying to fix it with a home depot trip, but itโs a nuisance that I should have to. For the price I guess I canโt complain, but then again when paying for something new I should be receiving everything whole and in good condition. The box that it came in looked damaged and was duck-taped as well, but the rack itself did not seem to be damaged. All in all, satisfactory with this product. Iโm sure once itโs up and fixed and attached it will work great, but for now putting it together has been a complete pain due to faulty parts. Lastly, what spray, sealant, or plasty dip did people use to protect this product from rusting?
C**E
Love it.
Sturdy, well-built cargo rack. A little bit of assembly required, not bad. I got the extension, too, to put on my '94 Pathfinder. Fits well, although I've found the mounting brackets don't hold very well on my factory roof racks. My crossrails are too thin. So I'll have to MacGyver up a fix for that, but for most people, especially with newer model cars, that shouldn't be an issue. Curt does need to hire someone in their naming department, though...18115 is worse than any name BMW has(n't) come up with. Although the rack is lightweight (I had no problem handling it by myself, even lifting it on to the roof with the extension in) build quality is on par with much more expensive cargo baskets (Yakima LoadWarrior, MegaWarrior), at a much lower price. My two oldest kids climbed up in it for fun, held them both up fine with very little flex. The two of them combined would be about 180 lbs., and my factory roof rack says max capacity 80lbs. So you can tell that cargo basket distributes the weight well, effectively multiplying you weight capacity. I haven't noticed a change in the handling. There is a bit of added wind noise, but the fairing helps with that somewhat. If you're looking for a rack, just get this one. You won't find better quality at a lower price.
E**I
Excelente
Excelente canastilla muy bien hecha ...ligera...resistente...fรกcil de armar....la pintura de buena calidad.... Toda se ensambla a la medida...... Muy buena tomando en cuenta costo beneficio....recomiendo ampliamente anexo fotos
A**R
Solid Rack
Rack seems solid enough. Have had it installed on my CX-5 for a few days now. Wind noise is what you would expect, it's loud on the highway. I thought the product looked great. Seemed to be no defects in the paint or welds that I could find. Instructions for install are garbage. Luckily it is a simple product that you could figure out by yourself. Installed onto my square thule bars easily.
S**6
This rack has been great on my 2016 4runner
This rack has been great on my 2016 4runner. I bought the rack extension to go with it as well. With the extension in place I did find the rack to actually be too long for my vehicle. I ended up cutting off about 3 inches of the extension rack, and welded the inserts back on. Now it fits from the sunroof to the back edge of the shark fin antenna. I have used it for a bunch of camping gear this summer and it has performed great! Next step will be to attach some LED floods to the back. I will probably remove the rack for the winter though, and give it a quick shot of paint as it seems there is a bit of rust showing on the joints. For the price, I expected that. Will try to follow up with a longevity report.
J**R
Para cargas extras
Perfecta para la Jimny
C**N
Good product, crappy hardware!
The cage itself is good. The supplied mounting hardware is complete garbage. And to give some credibility to this review I am a Licensed Mechanic. I have overhauled Diesel engines, by the hundreds, right in the field where ever they died. I've drilled and tapped broken exhaust studs, installed hell-coils, dealt with cross threading and damaged threads etc. etc......so I know a little bit about threads and hardware. I fought with this stupid mounting hardware for the past half-hour. It's almost like every u-bolt is standard and the wing nuts are metric. When I get to work tomorrow, I'm casting the supplied hardware to the depths of hell where it belongs and I'm making my own! But at least the cage is good! And looks great on my 4 Runner.
Trustpilot
3 weeks ago
2 weeks ago