Desertcart purchases this item on your behalf and handles shipping, customs, and support to Iceland.
โจ Elevate your surfaces with glass-like perfection that lasts! ๐
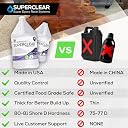
Superclear Table Top Epoxy Resin 2 Gallon Kit offers a self-leveling, crystal-clear coating with a 1:1 mix ratio for easy application. Featuring advanced UV resistance to prevent yellowing and a food-safe finish, itโs ideal for tabletops, bar tops, and creative projects. Manufactured in the USA with over six decades of expertise, this epoxy resin delivers durable, high-gloss protection that professionals and DIYers trust.


| Customer Reviews | 4.5 out of 5 stars 15,634 Reviews |
S**.
Awesome product!
This epoxy resin was super easy to work with. The directions were very clear. I only needed one coat to create an extremely clear and durable resin coat on my 24x 26โ coffee table. So far the durability is tremendous especially since there is a three year old running around and being a 3 year old. The quality is great.
A**Y
Great product and awesome support
I bought this product as well as the Liquid Glass version, for a coffee table made out of a tree trunk slice. This was my first project with Epoxy, and the Superclear team was very helpful to answer my newbie questions along the way. They were very friendly and provided great coaching. I will use their products again in the future and I strongly recommend them. I am still working on the project and will add pictures once completed. Here are some suggestions from my own experience: - Choose the right epoxy for the right application. If you are going to do a deep pour (> 1/4") you are going to need either a deep pour epoxy, or several layers of tabletop epoxy. - Have your tools ready (epoxy, mixing container, paint mixing stick, timer, gloves, paper towels, isopropyl alcohol for cleanup, torch for bubbles) and protect your work area because some of the epoxy will spill from the side of your workpiece - Follow the mixing instructions carefully (this product is mixed with a 1:1 volume ratio - I bought some cheap mixing cups -- use a timer and scrape the sides of your mixing container to make sure the product is thoroughly mixed. Failure to do so could result in the product not curing, or not curing evenly) - Check the temperature -- it was cold when I was doing my pours and I had challenges with it, although SuperClear epoxy is very forgiving (bubbles make their way to the surface and they pop). If the wood is cold, it will bubble up when you apply the epoxy (and it will keep bubbling up for hours). I ended up bringing the workpiece into a ventilated room and having a small heater to warm up the room, so that the wood would be at > 70 degrees - Prepare the wood carefully - make sure it is flat and that small holes are filled. A good solution is clear CYA glue (like 2P10) + a CYA activator to dry the glue faster. If you do not do that, the epoxy will go into these holes, and the epoxy top will not be flat. Once the glue is dry, it can be sanded flat with 80 Grits (I use a random orbital sander). If you want, and based on your specific project, you can use a colored CYA glue. - Start with a thin layer of epoxy, to let the wood absorb the epoxy (1 Oz per square foot). Apply the epoxy and then use a torch to blow up the bubbles. More than likely, the absorption of the epoxy will not be even across the wood surface and you will notice all the holes which were not visible before. Epoxy has an uncanny ability to show these holes, due to surface tension. - At this stage, you have 2 options: either you apply the next coat when the first one is still tacky, or you wait for the first coat to cure completely and then sand it with 220 Grits to allow the next coat to bond to the previous coat. If you do so, wear a mask! Epoxy dust is not good for your lungs. Once sanded, the surface will look white. Clean it with a rag, vacuum it and clean again with a wet paper towel to remove any resin powder. That wet finish is what it will look like once the next coat is applied. You are now ready for a second coat, and do not worry too much about sanding marks, as epoxy has a magic ability to hide them. Depending on the imperfections and the size of the holes, you might need to repeat this process until you are ready for your last pour. I have seen some people apply epoxy to just the areas with holes, until they were filled. You can theoretically use CYA glue as well, but it might turn yellow over time so I did not want to take that risk. - The last pour will have 3x the volume of the previous pours. Use a notched trowel to distribute the epoxy, and use your gloves to rub the epoxy onto the sides of your piece. Use the torch to remove the bubbles, and ideally cover your piece while it dries, so that you do not get pet hair or specks of dust into your epoxy (I am still struggling with that speck-free finish, to be honest). The larger pour volume will cover the last remaining imperfections, leading do a beautiful, flat, glossy finish. - If you need to protect the bottom side of your piece from epoxy drips, apply painters tape to the bottom side (just around the periphery), and once the top is fully cured, turn the piece upside down and use a heat gun to soften the epoxy drips and remove the painters tape. - If you need to fill larger holes, then you might need deep pour epoxy, and you will need to make sure that the hole does not go through the other side of the piece. If it does, you can use packing tape to mask the hole on the bottom side. You might also need wood (MDF covered with packing tape works well) to keep the epoxy from running. Also, you can apply a bead of silicone around the hole on the top side, so that you can overpour the epoxy on that side, to allow for some settling. See videos online for more advice. I hope this helps!
T**L
Great Stuff!
Worked and cured well - watch a few project videos first, and you'll be pouring resin like a pro in no time. Very low VOC - can be used indoors without mask as a result, which is HUGE! Make sure your pouring surface and work area is at least 65 degrees F for best results... and keep a hand torch ready, as just a quick pass of the Bernzomatic open flame will remove troublesome and unsightly "bubbles" that form during the early curing phase (before the epoxy sets). Took the dyes flawlessly, I had light gray base with blue and moss green details for walls, snow white for the ceiling (it was a multi-color, multi layer, multi piece custom bath enclosure) - sorry for the blurry image. Project came out looking great, the edges sealed perfectly with silicone, custom fit shower enclosure is 100% waterproof. Beware "buggy" grades of plywood as pouring substrate: I used a construction-grade 1/2 plywood as my flat base - and though nothing of it, as a good strong substrate. But if you use plywood as a base, especially construction grade, be careful as many commercial grade plywoods can have small "bugs" living just below the surface! I was unaware of this, and when my first coat of epoxy went on, I had to spend several minutes and intervals during curing picking "bugs" (small, gnat-like critters) which migrated out from the sub-layers of the plywood. At first i though I had a hole in my window screen, but no, they were coming from inside the plywood, and migrating INTO my lovely epoxy resin! Honestly I have run into this issue before, when 1st-coat painting fresh plywood projects - so it was more of a distraction, and actually did not harm the wood, the piece, or the project. It was just annoying, picking gnats out of setting epoxy... had I used particle board or another substrate, I would not have had this issue, so "my bad" but no harm done. I will definitely purchase this epoxy again: And excellent product, handles and performs very well, easy to use and "master"... looking forward to my next epoxy project!
B**D
Is ok but produces too many bubbles.
Not my favorite. I ordered this brand before but ordered the countertop clear epoxy. Love, love, love that one. It is so easy and goes down so beautifully. This one produced way too many bubbles. I only mix this one manually and was careful not to produce too many bubbles. Even when mixing it there were airborne bubbles coming out of the bucket like it was soap bubbles. The consistency is thicker and a little harder to work with. I achieved a bubble free pour using a heat gun but it wasnโt as easy to get rid of them as the countertop epoxy one. I ordered this one on accident, but there are no returns so I had to proceed with this one. The smell seems a bit stronger too. Cure time was a little faster than the countertop epoxy as well.
K**6
5 stars
They did a great job resolving an issue. Great product and great customer service.
D**E
Love this stuff
This resin is awesome. It dries quickly and shiny, clear and bright. I mixed it with white pigment and my project came out amazing. I already purchased another set of these bottles. They cured perfectly.
G**.
Super clear, Easy to use, sets quickly..Best I've ever used!!
Best I've ever seen. I've been a professional resin artist for over 20 years. From paintings on canvas to sculptures and river tables. I don't mix it in a bucket or cup since there is a chance it wont get mixed well. I use milk jugs and shake it. Which leads me to my next point. Shaking causes a ton of bubbles. Other resins just dont clear up as good as this stuff. I "Brush" of "sweep" it quickly with a larger blow torch about every 10 minutes until it starts to glass up. This brand comes clean better than anything else I've used before and sets up quickly which is great for my paintings because the canvas level can create uneven settling even if im off by a fraction. The last 3 paintings I've done with this resin have come out absolutely perfect. Im sold on the stuff! Will definitely recommend. If you need a slower curing resin, you can add a little the 50/50 deep pour resin to slow it down.
B**E
Will not purchase this again (from an experienced epoxier)
I am a veteran in the world of epoxy countertops and have had a small business since 2018. Needless to say, I have tried many epoxy brands, and my go-to is purchased from Grand Junction, CO (great results every time, heat resistant to 500 degrees.) We were doing our own kitchen, 78 sq. feet of counters, so since it was a personal project I decided to test out this brand and save some money. You get what you pay for. Thankfully I was wise enough to first do a small pour (about 1.5 sq. ft) making a small dog food tray and the design came out great and cured quickly. A few days later I poured the clear coat. It was 2.5 ounces of part A and B for a whopping total of 5 ounces. I mixed for a full five minutes in a silicone cup (exactly how I had done the design/color coat.) Yes--I mixed thoroughly, and definitely for long enough, and the epoxy was over 75 degrees (it has been in the low 100s where we live this summer and the garage is always warm.) Poured it on my dog tray project and it simply never cured. In fact, it has been two full weeks already and it is STILL sitting out in the garage, tacky. The entire thing is tacky, every square inch, not just one or two spots. I called the manufacturer and got in touch with customer service. The rep there, a young kid, told me that the ONLY reason the epoxy wouldn't have cured is if I "scraped the sides of the cup and maybe some unmixed epoxy was on there." He then said, "I mean, yeah, we get it, you want to get your money's worth since you paid for the product, but if you scrape the sides of the cup, you risk having unmixed epoxy get onto your project." Um, NO DUDE. That is not the problem. I have mixed literally hundreds of epoxy projects big and small and yes I ALWAYS scrape the sides to mix thoroughly (I am fanatical about mixing properly) and then ALWAYS transfer to a second clean cup/bucket to ensure there is no unmixed epoxy (I did not tell this to the kid who must have thought I was an idiot.) I have never once ever poured a project that did not cure, ESPECIALLY the entire surface (not just a few soft spots.) His reasoning was absurd. So, one is just supposed to mix the epoxy in the middle and not touch the sides of the cup for fear of coming in contact with unmixed epoxy?? That doesn't make sense. And even if it that WERE a plausible explanation, at least some parts of the pour should have hardened up and the "unmixed epoxy" areas would stay tacky. This was not the case. The entire thing, no matter where I touch it, is still tacky. To top it off, the entire design yellowed terribly within just a couple hours of being in sunlight. EDIT-I have attached a few photos showing how, after 2.5 weeks, we had to scrape off all the gooey epoxy using alcohol, acetone, and chisels. The entire thing had to be cleaned, sanded, and re-poured (clearcoat) using my regular go-to brand which never fails. Thank goodness we did not use this on our huge kitchen project. I will never purchase this epoxy again for anything, not even craft projects. I am sorry I bought the 2 gallon kit. Waste of money for a product that does not perform, EVERY time, exactly as it should. There is something sub-par about this formula. Mixing exactly 2.5 ounces of each for a full five minutes by timer should have definitely mixed up enough to cure properly with a rock hard finish. And the yellowing thing is a deal breaker too. The only plus about it was that it did finish out crystal clear with absolutely zero bubbles.
Trustpilot
3 weeks ago
2 weeks ago